GKE NFS with Google Cloud Single Node Filer and Google Cloud FileStore
2017-09-01Sometime ago, a customer of mine asked me how they can setup a simple GKE cluster with a shared NFS filer. Back then I put together a small demo with GKE+Single Node File as provided by Google Cloud Marketplace. However, there are now two ways to do this: use the ‘single node filer’ and GCP’s managed Cloud FileStore (hint, the latter is strongly recommended!!).
Google Cloud provides an easy to deploy Single Node Filer which with a couple of clicks, you’ve got your very own NFS server. While there are some very clear issues with the single node filer such as being a single point of failure (i.,e it only runs on one VM), its much easier to setup than GlusterFS or other systems on GCP. Even GKE Persistent Volumes come with their limits where only one node can write while many can read.
However, just as easily with the same number or clicks, you can create a managed NFS server on GCP as Cloud FileStore.
Ofcourse both offer a standard NFS host:/share to for your application to bind to and the steps outlined below describe how to deploy a simple GKE service that mounts the filer for read-write by all instances.
This article also describes two variations for NFS Storage on k8s and you can choose one of them during this tutorial. If you would rather just understand GKE+NFS, use the SingleNode Filer. If you’d rather setup Filestore as a managed service, use that. Finally, this article demonstrates two ways to mount the NFS type you choose: direct Volumes or as a StorageClass.
NFS as direct Volumes
A direct volume mount will simply map a volume to the root mountpoint. In this example, its 10.128.0.9/data. Any files read or written to by any deployment will be under /data.
NFS Client Provisioner (StorageClass)
On the other hand, a client provisioner will carve out a dynamic path under /data for each persistent volume claim set. That is, if I declare the configuration below, k8s will dynamically create a slice specifically for this claim under /data. For example, k8s will create something like:
/data/default-nfs-claim-pvc-607d8ea1-e7c7–11e8–9bfc-42010a80006b
The NFS provisioner is described here in more detail:
apiVersion: extensions/v1beta1
kind: Deployment
metadata:
  name: myapp-deployment
...
...
spec:
  replicas: 2
  strategy:
    type: Recreate
  template:
    metadata:
      labels:
        type: myapp
        tier: frontend
        version: v1
     spec:
       containers:
       - name: frontend
         image: salrashid123/single_node_filer
         imagePullPolicy: Always
         ports:
         - containerPort: 8080
         volumeMounts:
         - mountPath: "/apps/data"
         name: nfs-volume
       volumes:
       - name: nfs-volume
         persistentVolumeClaim:
           claimName: nfs-claim
---
kind: PersistentVolumeClaim
apiVersion: v1
metadata:
  name: nfs-claim
  annotations:
    volume.beta.kubernetes.io/storage-class: "nfs-client"
spec:
  accessModes:
    - ReadWriteMany
  resources:
    requests:
      storage: 1Mi
ok…the first step is to setup an NFS Server:
1. Create the Single Node Filer OR Cloud FileStore
SingleNode FIler
For the Single Node Filer, I called my filer singlefs-1-vm.
I selected us-central1-a as the filer zone as well as the zone for the GKE cluster.

On your local system, find the ip address for the filer
for me it was:
$ gcloud compute instances \
   describe singlefs-1-vm \
   --zone=us-central1-a \
   --format='value(networkInterfaces[0].networkIP)'

10.128.0.9
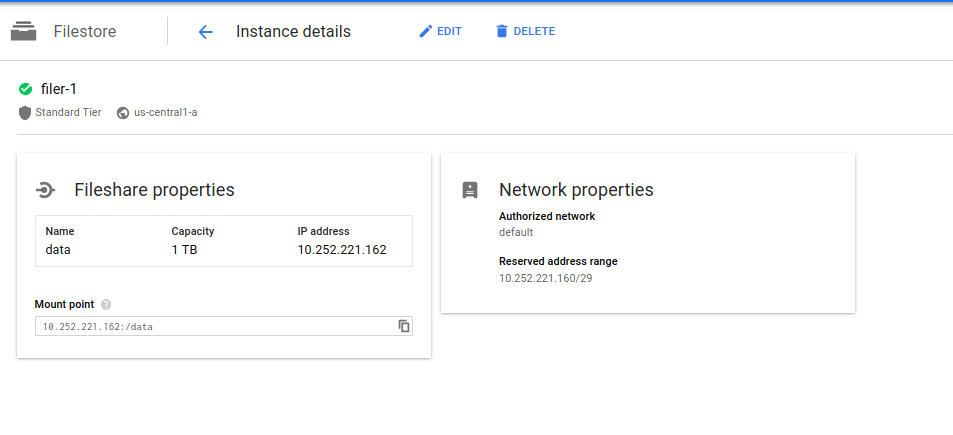
Cloud FileStore
For Cloud FileStore, simply create any instance but remember to set the FileShare mount to /data (which is what I use in the example yaml files below).
Note the IP address provided since you will use that in the specifications later if you choose to use FileStore.
2. Create a simple GKE cluster
I used cloud shell and ran
$ gcloud  container  clusters create "filier-cluster" \
    --zone "us-central1-a"
    ---machine-type "n1-standard-1" \
    --num-nodes "3"
3a. NFS as direct Volumes
The following section will deploy GKE ReplicaSet with direct volume mounts on NFS:
Copy and paste the following files in:
my-srv.yaml
---
apiVersion: v1
kind: Service
metadata:
  name: myapp-srv
  labels:
    type: myapp-srv
spec:
  type: LoadBalancer
  #type: NodePort
  ports:
  - name: my-srv-port
    protocol: TCP
    port: 8080
    targetPort: 8080
  selector:
    type: myapp
my-deployment-volume.yaml
Note: I added in the IP address of the single node filer (10.128.0.9) SPECIFY the IP address (GCE internal DNS does not does not resolve without additional work!!!)
Now lets use a configuration to that will mount the NFS volume in directly:
the image salrashid123/single_node_filer does the following simple steps:
- listen on
:8080 /readlists any files under/apps/data/writewrites a file with the node name and timestamp to/apps/data
Create the GKE service and replicationController:
$ kubectl create -f my-srv.yaml -f my-rc-volume.yaml
service "myapp-srv" created
replicationcontroller "myapp-rs" created

$ kubectl get no,po,svc,rc
NAME                                               STATUS    AGE       VERSION
no/gke-filier-cluster-default-pool-8f6193e8-21kn   Ready     1h        v1.6.7
no/gke-filier-cluster-default-pool-8f6193e8-3tz1   Ready     1h        v1.6.7
no/gke-filier-cluster-default-pool-8f6193e8-ktxt   Ready     1h        v1.6.7
NAME                READY     STATUS    RESTARTS   AGE
po/myapp-rs-11jqc   1/1       Running   0          3m
po/myapp-rs-2sjgc   1/1       Running   0          14s
po/myapp-rs-5l0kl   1/1       Running   0          14s
po/myapp-rs-fftx5   1/1       Running   0          14s
po/myapp-rs-vm5vb   1/1       Running   0          14s
NAME             CLUSTER-IP    EXTERNAL-IP      PORT(S)          AGE
svc/kubernetes   10.47.240.1   <none>           443/TCP          1h
svc/myapp-srv    10.47.241.2   104.197.18.186   8080:30256/TCP   17m
NAME          DESIRED   CURRENT   READY     AGE
rc/myapp-rs   5         5         5         3m
now Get a coffee until the GCP loadbalancer is setup, really..it takes like 5mins
The IP address for the LB I got is 104.197.18.186 (yours will be different).
Invoke the endpoint to read the file:
$ curl http://104.197.18.186:8080/read
$
You won’t see anything (unless you manually added a file to /data earlier manually)
Then add a file by invoking the /write endpoint
$ curl http://104.197.18.186:8080/write

File /apps/data/myapp-rs-11jqc-01_Sep_2017_19_46_03.html written
Repeat a couple of times and then read:
$ curl http://104.197.18.186:8080/read

myapp-rs-11jqc-01_Sep_2017_19_46_03.html
myapp-rs-11jqc-01_Sep_2017_19_46_36.html
myapp-rs-5l0kl-01_Sep_2017_19_48_00.html
myapp-rs-2sjgc-01_Sep_2017_19_48_14.html
myapp-rs-2sjgc-01_Sep_2017_19_48_16.html
What that indicates is different nodes all writing to one mount point because each file shows the node name that wrote the file!
If you browse the NFS system’s filesystem, you will see the files created directly on
root@nfs-server$ ls/data

myapp-rs-11jqc-01_Sep_2017_19_46_03.html
myapp-rs-11jqc-01_Sep_2017_19_46_36.html
myapp-rs-5l0kl-01_Sep_2017_19_48_00.html
myapp-rs-2sjgc-01_Sep_2017_19_48_14.html
myapp-rs-2sjgc-01_Sep_2017_19_48_16.html
3b. NFS Client Provisioner (StorageClass)
Now lets move on to using the same NFS server with a provisioner. What this does is setups a StorageClass on which k8s will dynamically parcel out subdirectories for your PersistentVolumeClaims.
Lets start off. We’re going to use a helm template to and install the NFS Provisioner:
- Create GKE Cluster
This step should’ve been done already above. In addition, allow yourself to crate higher level objects like StorageClasses:
kubectl create clusterrolebinding \
     cluster-admin-binding \
     --clusterrole=cluster-admin \
     --user=$(gcloud config get-value core/account)
- Install Helm
wget https://storage.googleapis.com/kubernetes-helm/helm-v2.11.0-linux-amd64.tar.gz

tar xzf helm-v2.11.0-linux-amd64.tar.gz

export $PATH=$PATH:`pwd`/linux-amd64
- Install NFS Provisioner Helm Chart
I personally prefer to not install tiller so the command set below only sets up helm as ‘client-only’
git clone https://github.com/helm/charts.git

helm init --client-only
Now initialize the chart by specifying the NFS server’s IP address from the previous steps
helm template charts/stable/nfs-client-provisioner \
    --name my-release \
    --set nfs.server=10.128.0.9 \
    --set nfs.path=/data  > nfs_provisioner.yaml
Create the provisioner
kubectl apply -f nfs_provisioner.yaml
- Deploy your application and the PVC

- Note that there is a new
StorageClasscallednfs-clientand our claimnfs-claimis now bound
$ kubectl get no,po,rc,svc,sc,pv,pvc
NAME                                                     STATUS    ROLES     AGE       VERSION
node/gke-standard-cluster-1-default-pool-14579aba-p1w6   Ready     <none>    4h        v1.9.7-gke.7
node/gke-standard-cluster-1-default-pool-14579aba-tj3p   Ready     <none>    4h        v1.9.7-gke.7

NAME                                                     READY     STATUS    RESTARTS   AGE
pod/my-release-nfs-client-provisioner-847d799d95-pmxh5   1/1       Running   0          1h
pod/myapp-deployment-6f54f5df48-26rff                    1/1       Running   0          2m
pod/myapp-deployment-6f54f5df48-8kzb2                    1/1       Running   0          2m
pod/myapp-deployment-6f54f5df48-g6ltr                    1/1       Running   0          2m
pod/myapp-deployment-6f54f5df48-kpjvr                    1/1       Running   0          2m

NAME                 TYPE           CLUSTER-IP     EXTERNAL-IP       PORT(S)          AGE
service/kubernetes   ClusterIP      10.11.240.1    <none>            443/TCP          4h
service/myapp-srv    LoadBalancer   10.11.249.20   104.154.154.158   8080:30974/TCP   2m

NAME                                             PROVISIONER                                       AGE
storageclass.storage.k8s.io/nfs-client           cluster.local/my-release-nfs-client-provisioner   1h
storageclass.storage.k8s.io/standard (default)   kubernetes.io/gce-pd                              4h

NAME                                                        CAPACITY   ACCESS MODES   RECLAIM POLICY   STATUS    CLAIM               STORAGECLASS   REASON    AGE
persistentvolume/pvc-607d8ea1-e7c7-11e8-9bfc-42010a80006b   1Mi        RWX            Delete           Bound     default/nfs-claim   nfs-client               2m

NAME                              STATUS    VOLUME                                     CAPACITY   ACCESS MODES   STORAGECLASS   AGE
persistentvolumeclaim/nfs-claim   Bound     pvc-607d8ea1-e7c7-11e8-9bfc-42010a80006b   1Mi        RWX            nfs-client     2m
- Send some
/readand/writetraffic to it.
Note the IP address for the loadbalancer is different (i ran this setup just recently so i got a different IP)
$ curl  http://104.154.154.158:8080/read
myapp-deployment-6f54f5df48-8kzb2-14_Nov_2018_04_44_20.html

$ curl  http://104.154.154.158:8080/read
myapp-deployment-6f54f5df48-8kzb2-14_Nov_2018_04_44_20.html

$ curl  http://104.154.154.158:8080/read

$ curl  http://104.154.154.158:8080/write
File /apps/data/myapp-deployment-6f54f5df48-8kzb2-14_Nov_2018_04_48_38.html  written

$ curl  http://104.154.154.158:8080/read
myapp-deployment-6f54f5df48-8kzb2-14_Nov_2018_04_44_20.html
myapp-deployment-6f54f5df48-8kzb2-14_Nov_2018_04_48_38.html
As before, the output shows multiple reads and writes creating and reading from the same mount.
If you used the SingleNodeFiler, simply ssh into that instance and navigate to the /data folder. You should see a dynamic PVC claim that the provisioner made for you. Under that folder, you’ll see the two files you just created!
root@singlefs-1-vm:/data# pwd
/data

root@singlefs-1-vm:/data# ls
default-nfs-claim-pvc-607d8ea1-e7c7-11e8-9bfc-42010a80006b

root@singlefs-1-vm:/data# cd default-nfs-claim-pvc-607d8ea1-e7c7-11e8-9bfc-42010a80006b/

root@singlefs-1-vm:/data/default-nfs-claim-pvc-607d8ea1-e7c7-11e8-9bfc-42010a80006b# ls
myapp-deployment-6f54f5df48-8kzb2-14_Nov_2018_04_44_20.html
myapp-deployment-6f54f5df48-8kzb2-14_Nov_2018_04_48_38.html
Conclusion
This article showed a variety of ways to setup NFS on GCP:
SingleNode FilerCloud FileStore
As well as two ways to mount NFS
- nfs
VolumeMount*NFS Provisioner (StorageClass)
You can pick and choose whichever one you need though I would suggest avoiding the SingleNode filer if availability is of concern.
Dockerfile
FROM python:2.7-slim
ADD . /app
WORKDIR /app
RUN pip install Flask requests
EXPOSE 8080
ENTRYPOINT ["python", "main.py"]
main.py
This site supports webmentions. Send me a mention via this form.