Setting up SAML for Google Cloud Identity for Customers and Partners (CICP)
2019-02-03Introduction
A little under a decade ago I wrote my first SAML IdP for the Google Search Appliance (yeah, that wonderful yellow box!). Since then, that script changed many hands and I’ve resued and adapted as an IDP for Google GSuites SSO and now finally in this article for Google Cloud.
This article circles back on that script but extends it for the Firebase Authentcation enchancements recently integrated into Google Cloud called Cloud Identity for Customers and Partners. This article is basically a picture book on how to setup your own SAML IdP and perform SSO with a Service Provider (SP) that is based off of the Firebase SDK or ‘roll your own’ Service Provider that hosts the SAML endpoint.
This is a simple ‘how to get started’ tutorial and ofcourse do not use any script contained here in production/qa,anywhere outside of yoru laptop! Also please note i’ve included public/private and API keys here. You really should regenerate the public/private keys (see Appendix).
Scenarios
As mentioned, there are two ways you can use this script with the same IdP:
-
SAML IDP with SP using Firebase Client SDK In this mode, you are using the FireBase javascript SDK running on your SP. This is the normal way you use this feature and is what is documented in the quickstart. The javascript runs in your browser and does all the legwork for you to handle the SAML, OIDC roundtrips. However, your site needs to use the SDK.
-
SAML IDP with SP without Firebase Client SDK Users that do not want to use the Firebase SDK, you can host your own (
AssertionConsumerService) ACS endpoint. What this means is a SAML IDP will redirect your users back to your own server and you have to validate theSAMLRequestusing CICP’s APIs. This usecase is for for more advanced usecases.
Note: at the time of writing (11/21), you need to manually alter the
SAMLConfigACS endpoint via API. Eventually you’ll be able to just edit the setting via the console…Also, I do not know much javascript so the example provided is not optimal.
You can find the source here
Setup
As this is just a tutorial to help you understand, we will setup the IdP and SP all locally on your workstation. The IdP used is common across both scenarios described above (as it should be) but the SP is different since one uses the Firebase SDK for CICP and the other manages the ACS. Switching between the two requires you to update the CICP ACS url (more on this later).
Configure /etc/hosts
Since we’re running everything locally, override the /etc/hosts file
127.0.0.1 sp.providerdomain.com sso.idpdomain.com
Configure CICP on any project
(in this example, the project I use in the example is called cicp-project)
Enable the CICP API
Setup Providers
We will setup Google OIDC too just for fun
-
click edit on
GoogleNote down the ClientID you see:- For my project, its ClientID:
226130788915-jjuno1gdaci0cci16o6tnokjs087resf.apps.googleusercontent.com
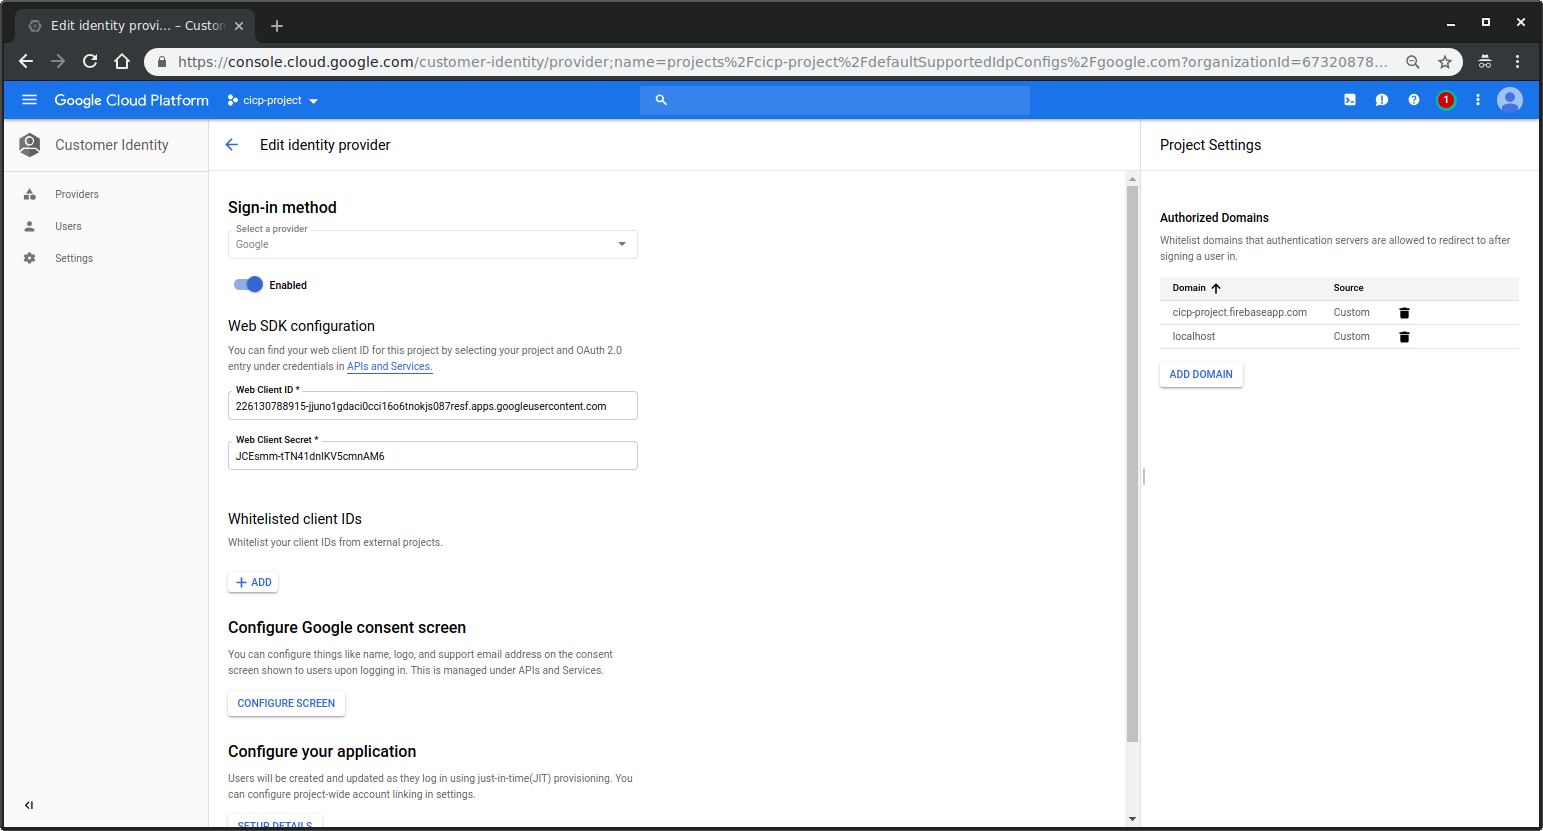
- For my project, its ClientID:
-
Setup Consent Screen You need to set some setting on the Consent screen here since we turned on OIDC
SAML
-
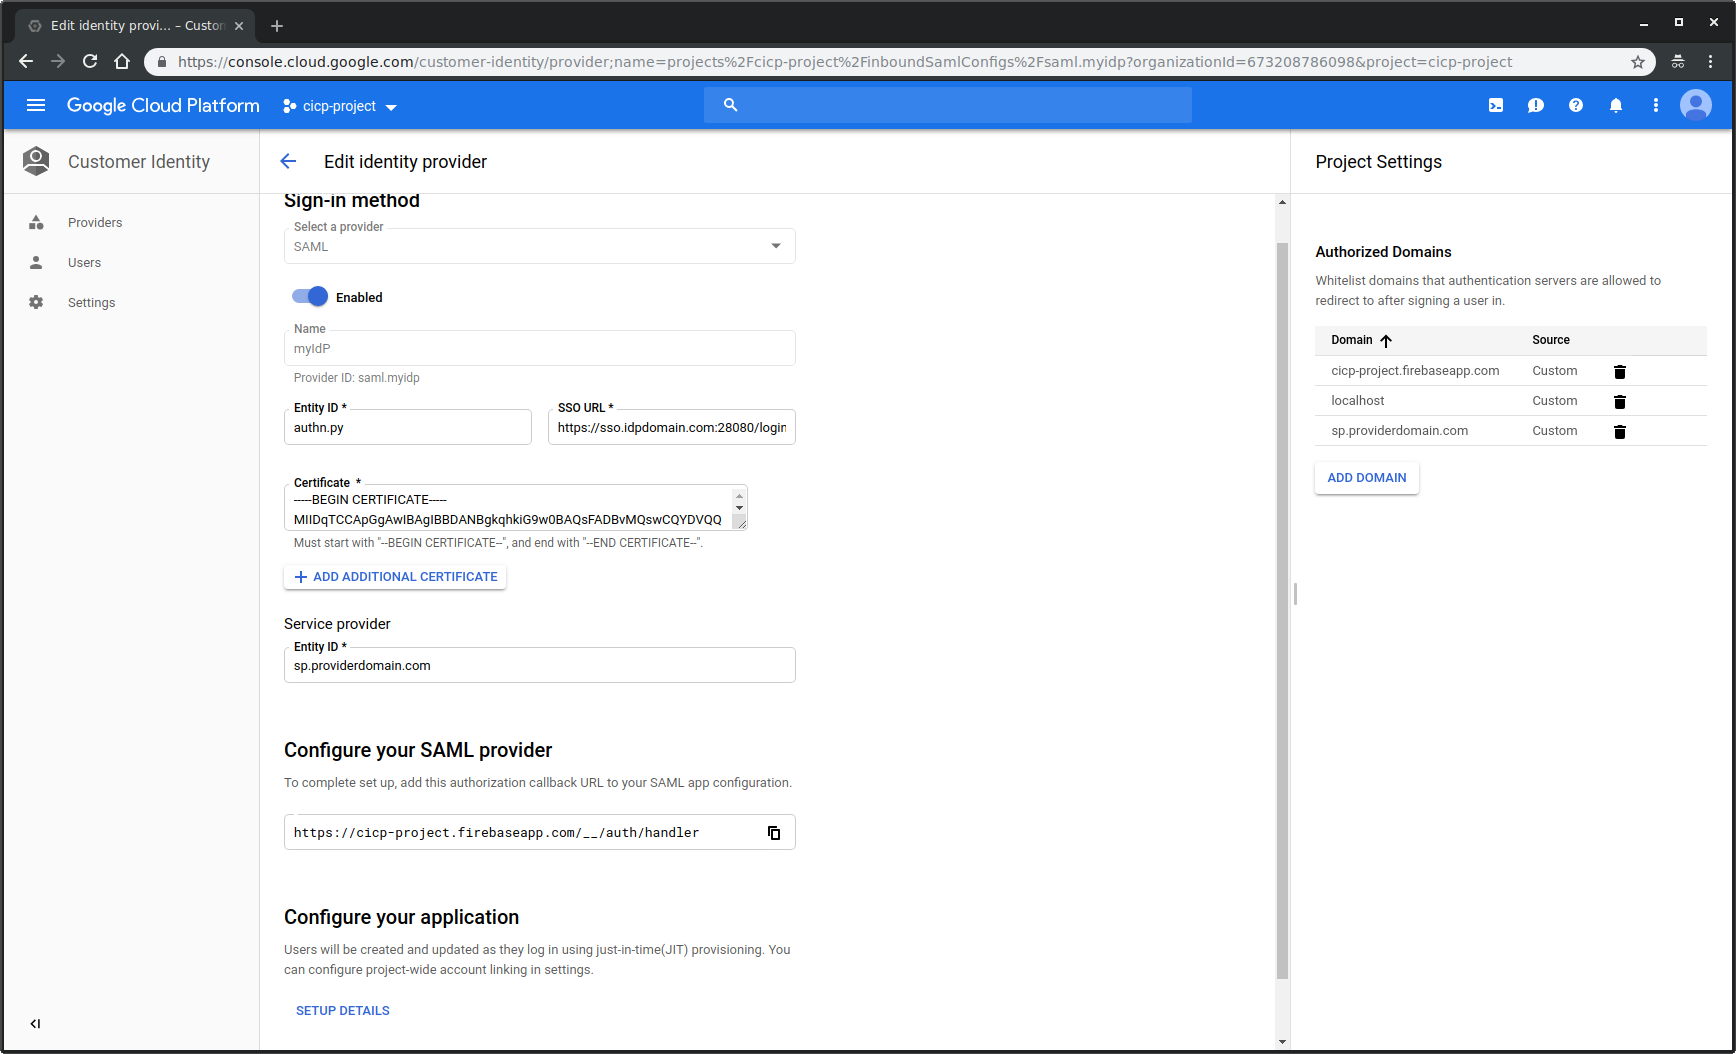
click create on
SAMLEnter the following:- Name:
myIdP - EntityID:
authn.py - SSO URL:
https://sso.idpdomain.com:28080/login - Certificate: copy+paste the file contents inside
idp/server.crt(as before, you should generate you eally own keys!) - Service Provider ID:
sp.providerdomain.com
- Name:
-
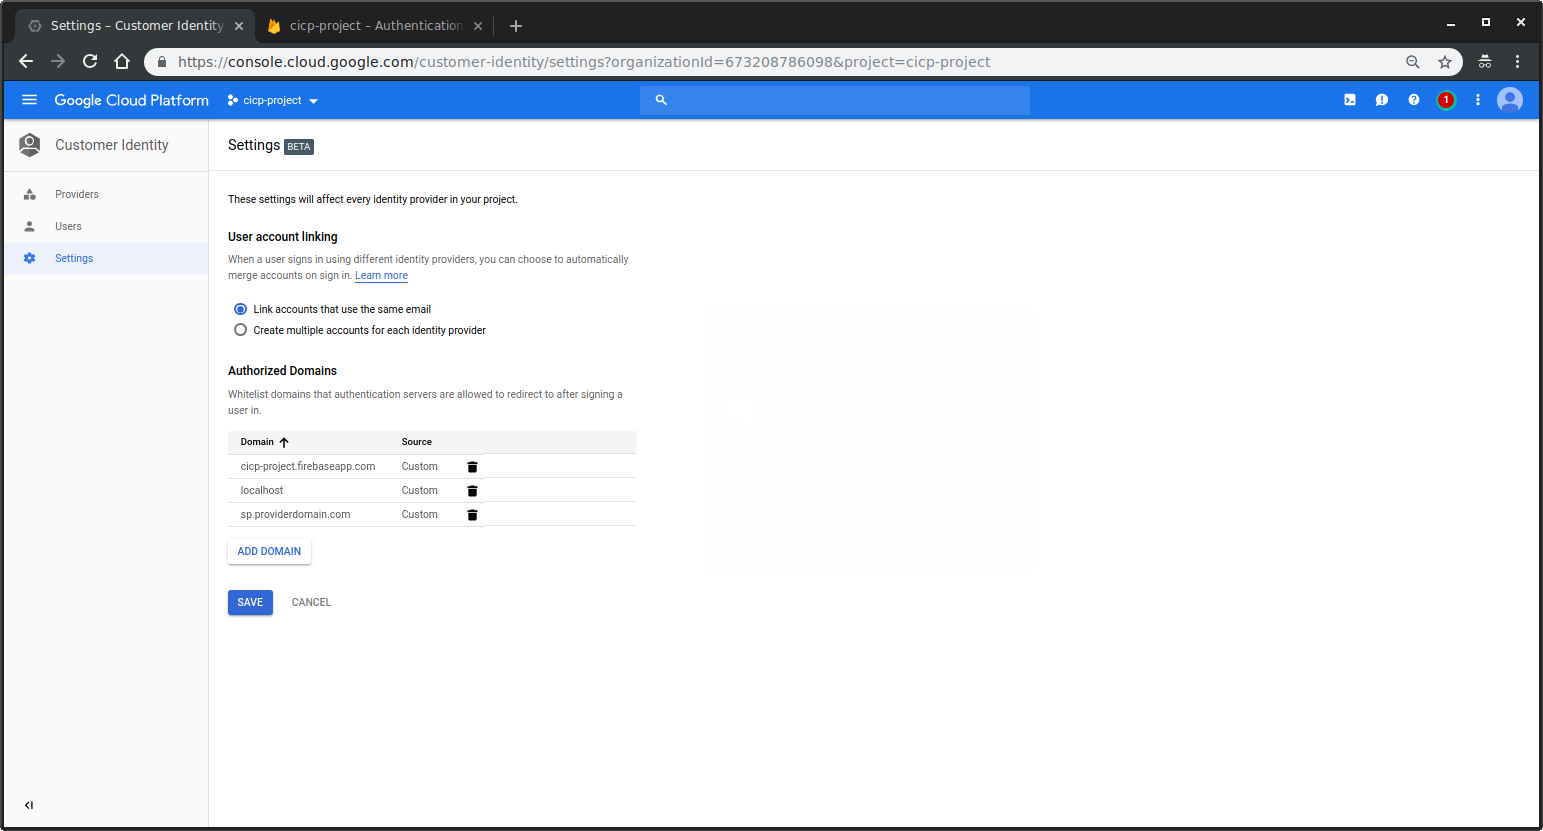
Under Settings
- Add Authorized DOmain:
sp.providerdomain.comThis will add your SP domain as a valid redirect for all auth mechanisms
- Add Authorized DOmain:
-
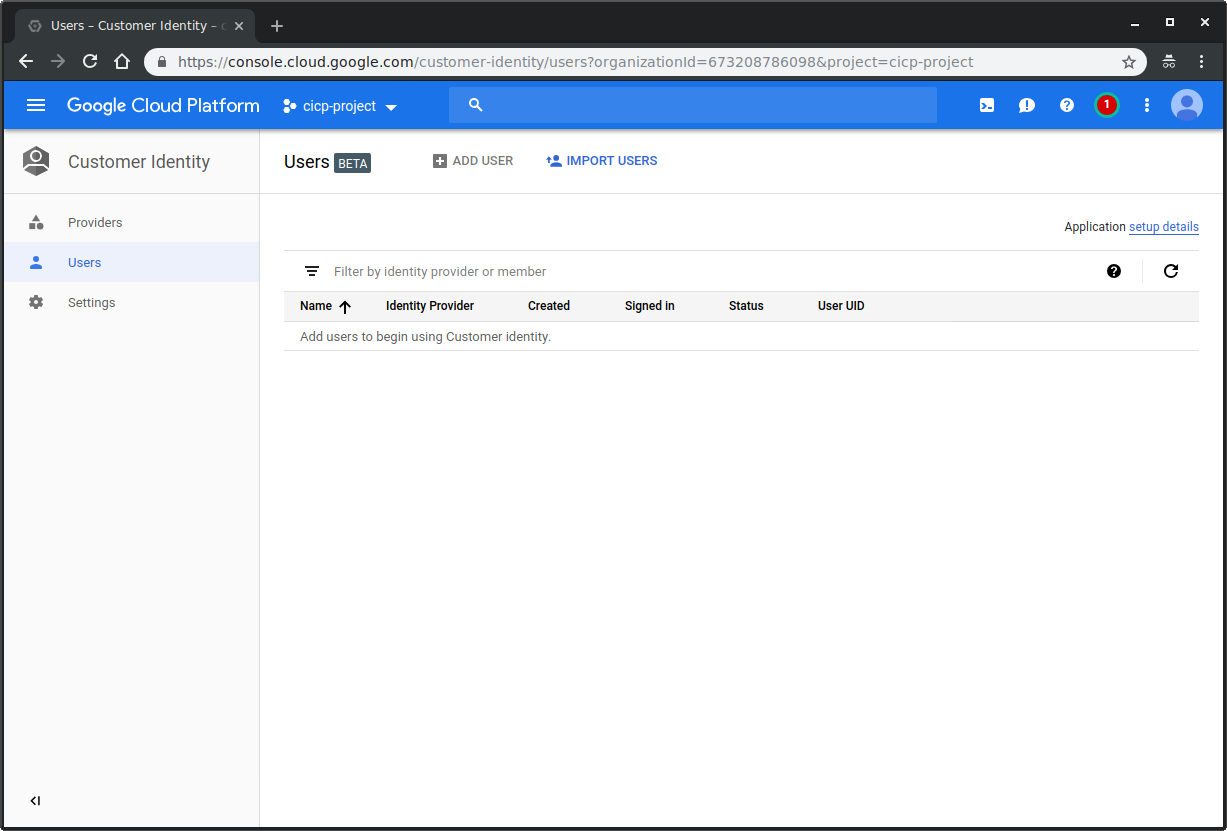
Users
- Nothing to do here; just verify no users are currently in your local project. (we will come back to this later)
-
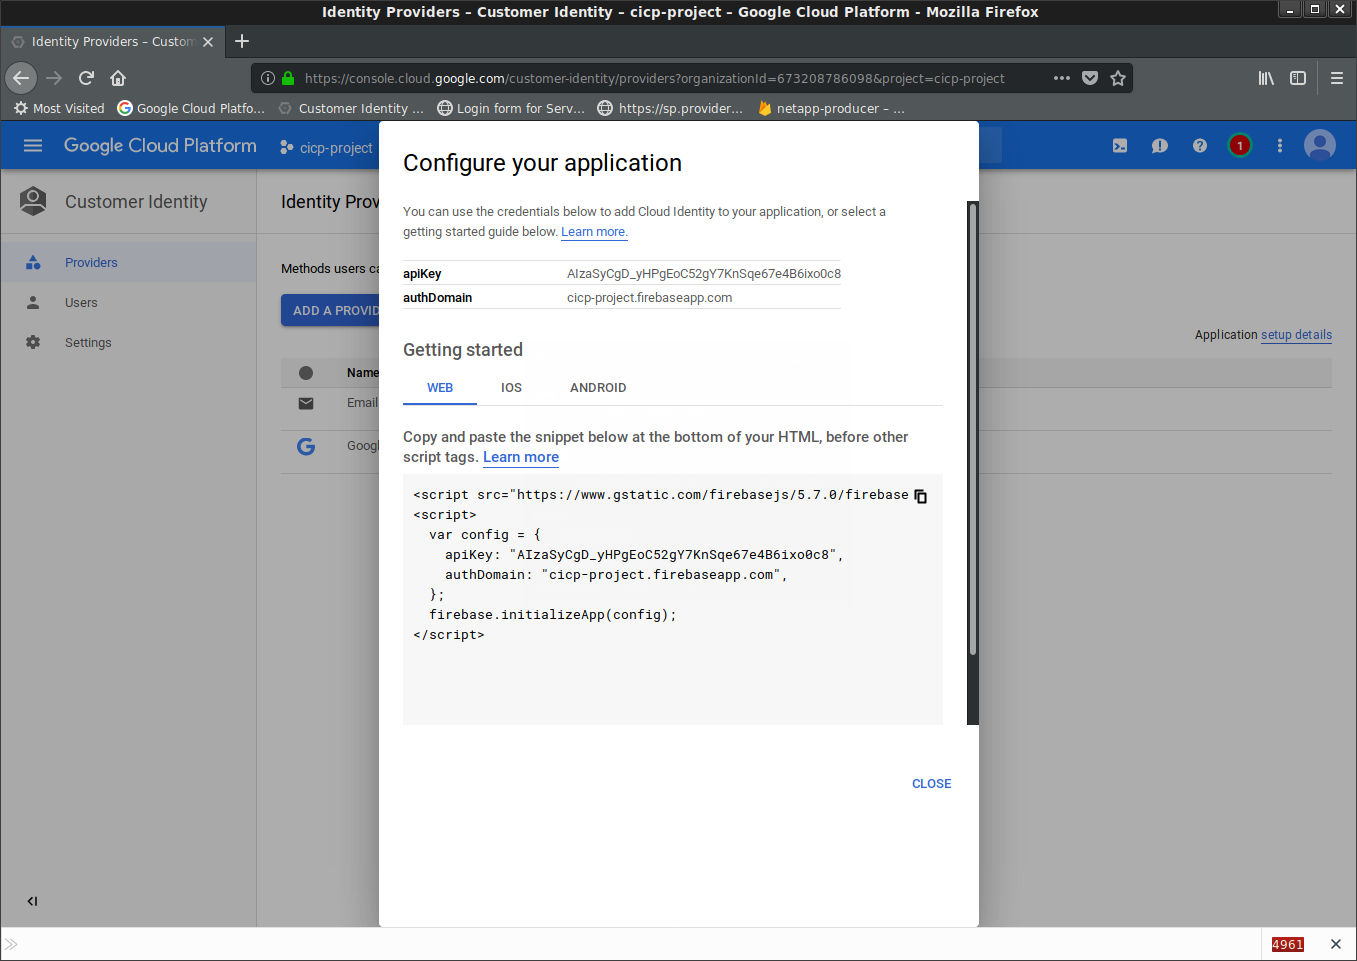
Providers
Click on “App Setup Details” on the top right This will give you a javascript snippet for your Firebase UI
copy the snippet into
sp_firebase/layout.htmlFor me, its:
      <script src="https://www.gstatic.com/firebasejs/5.7.0/firebase.js"></script>
      <script>
        var config = {
          apiKey: "AIzaSyCgD_yHPgEoC52gY7KnSqe67e4B6ixo0c8",
          authDomain: "cicp-project.firebaseapp.com",
        };
        firebase.initializeApp(config);
      </script>
- Edit
sp_firebase/secure.html, add the SAML providerID:saml.myidp
          const provider = new firebase.auth.SAMLAuthProvider('saml.myidp');
          firebase.auth().signInWithRedirect(provider);
-
Get ProjectID:
Goto https://console.cloud.google.com/home/dashboard and note down the Project number
ProjectID: 226130788915
Start IDP
Now start the commond IdP: Start SAML IDP
    cd idp

      docker run -t -p 28080:28080 \
        -v `pwd`:/app/:ro \
        --entrypoint=/app/saml_idp.py \
        salrashid123/appssso \
        --debug  \
        --cert_file=/app/server.crt \
        --key_file=/app/server.key
You might be wondering why you’re running some image called
salrashid123/appssso…thats just a prebaked image with the python xmlsec libraries build in. You are free to recreate that image…here is the repo and Dockerfile
SP Scenario: FirebaseSDK
First lets start the Firebase SDK based SP:
    cd sp_firebase

    virtualenv env
    source env/bin/activate
    pip install -r requirements.txt


    python main.py
Test Login
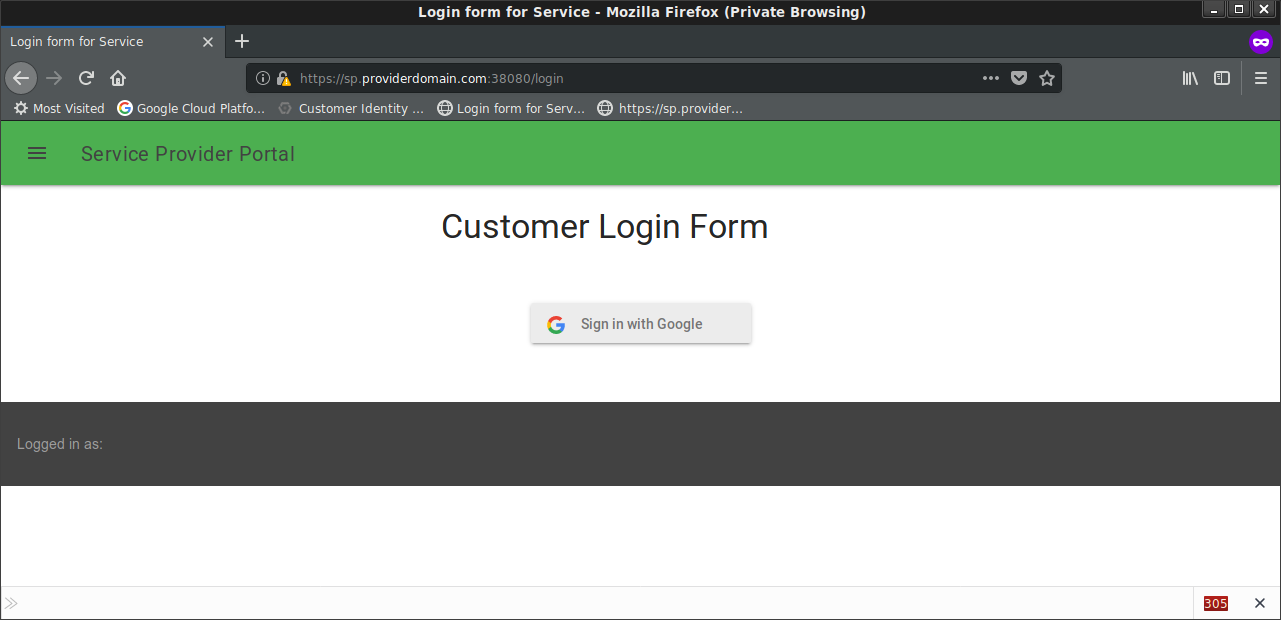
Open Incognito window goto: https://sp.providerdomain.com:38080/
Login with OIDC
First try Login with google account (in my example, i used user@esodemoapp2.com)
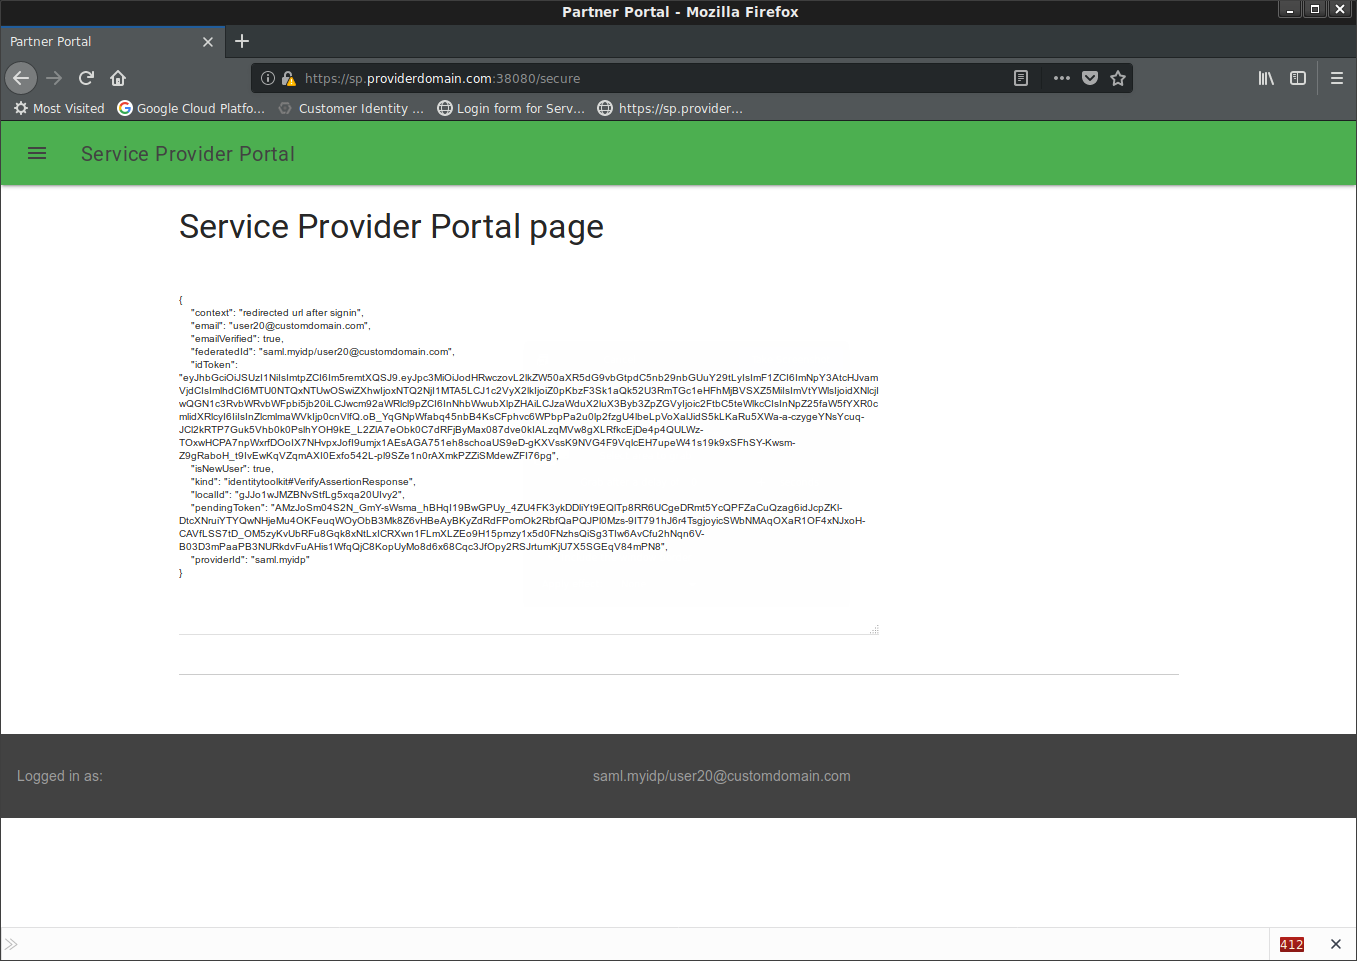
If everything goes well, you’ll get redirect and see the current loged in user at the footer of the page

Login with SAML
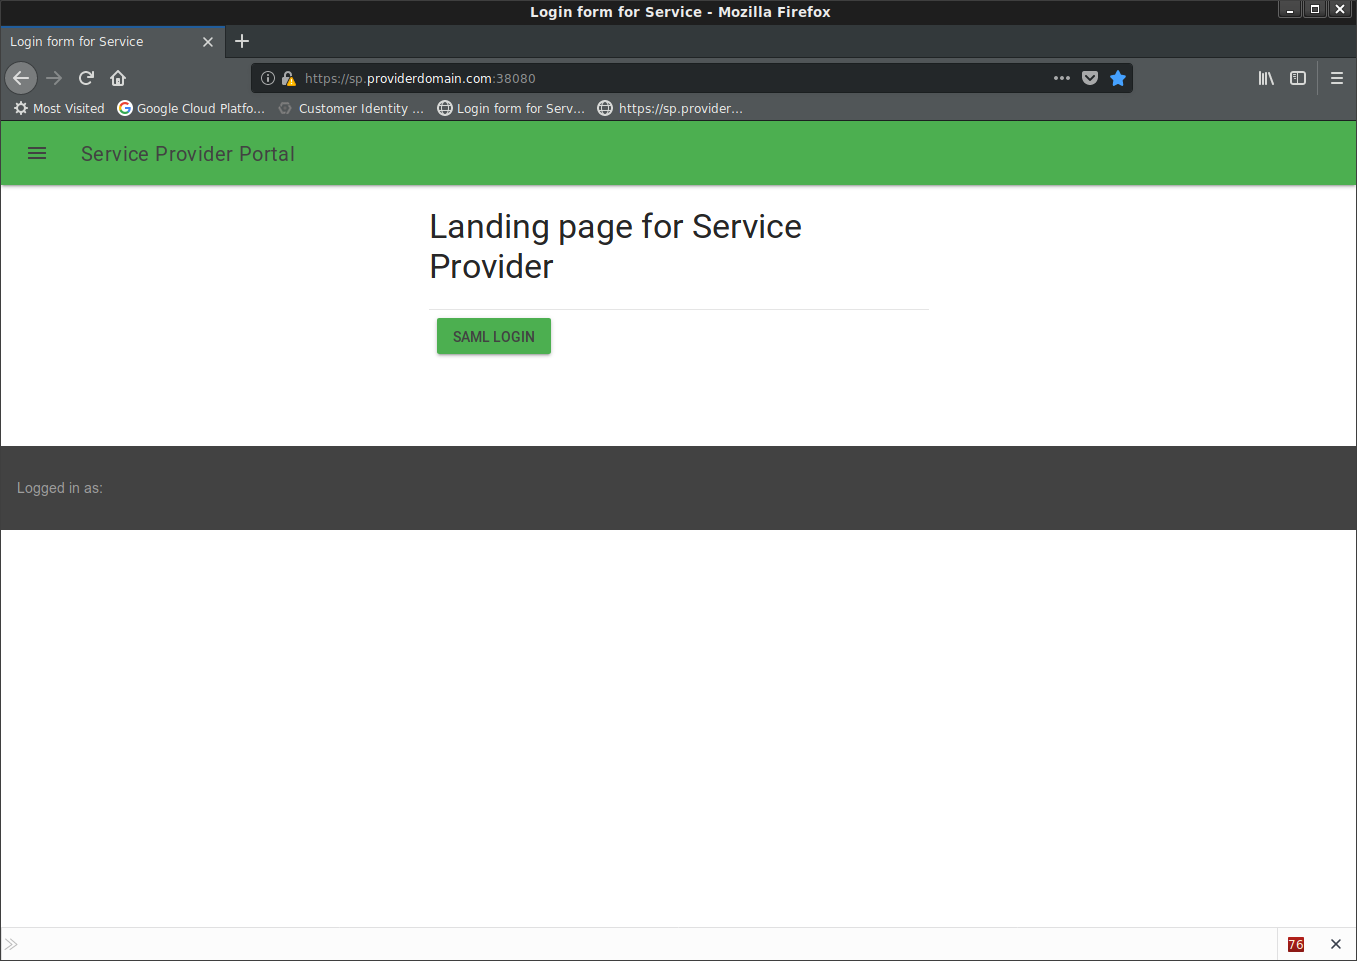
In a new incognito window and goto https://sp.providerdomain.com:38080/
Click Login with SAML
You’ll get redirected to SAML Login page on the IdP:
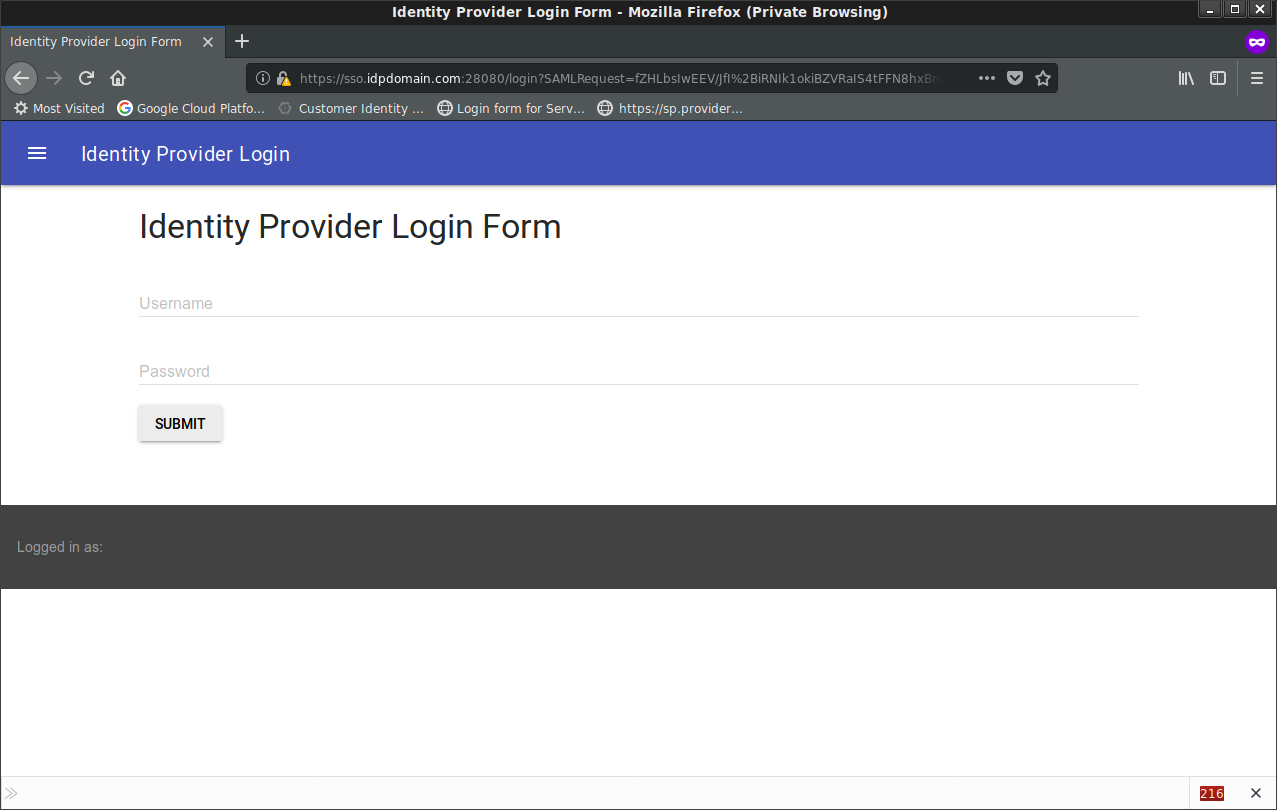
Enter (any* username/password (this is because i don’t do any validation on the idP; this is just a test!)
I entered: user1@idpdomain.com
You’ll see a temp page with the SAML Response (normally, your users don’t see this and i added in this pause just to show you the decoded SAML POST data)
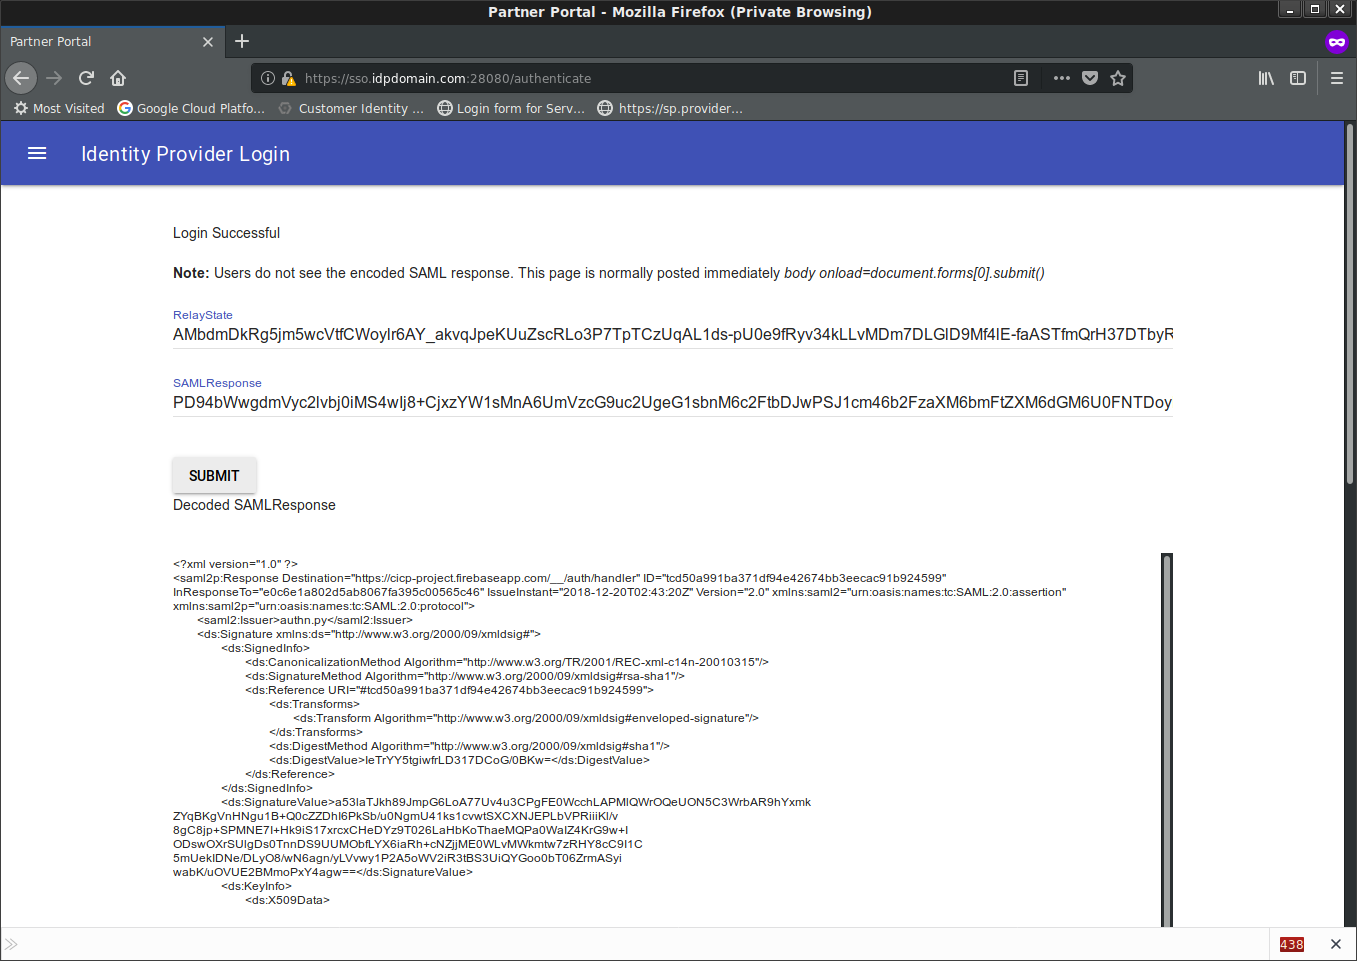
Once you click continue, you’ll see a login success screen on the IDP with the users credentials displayed
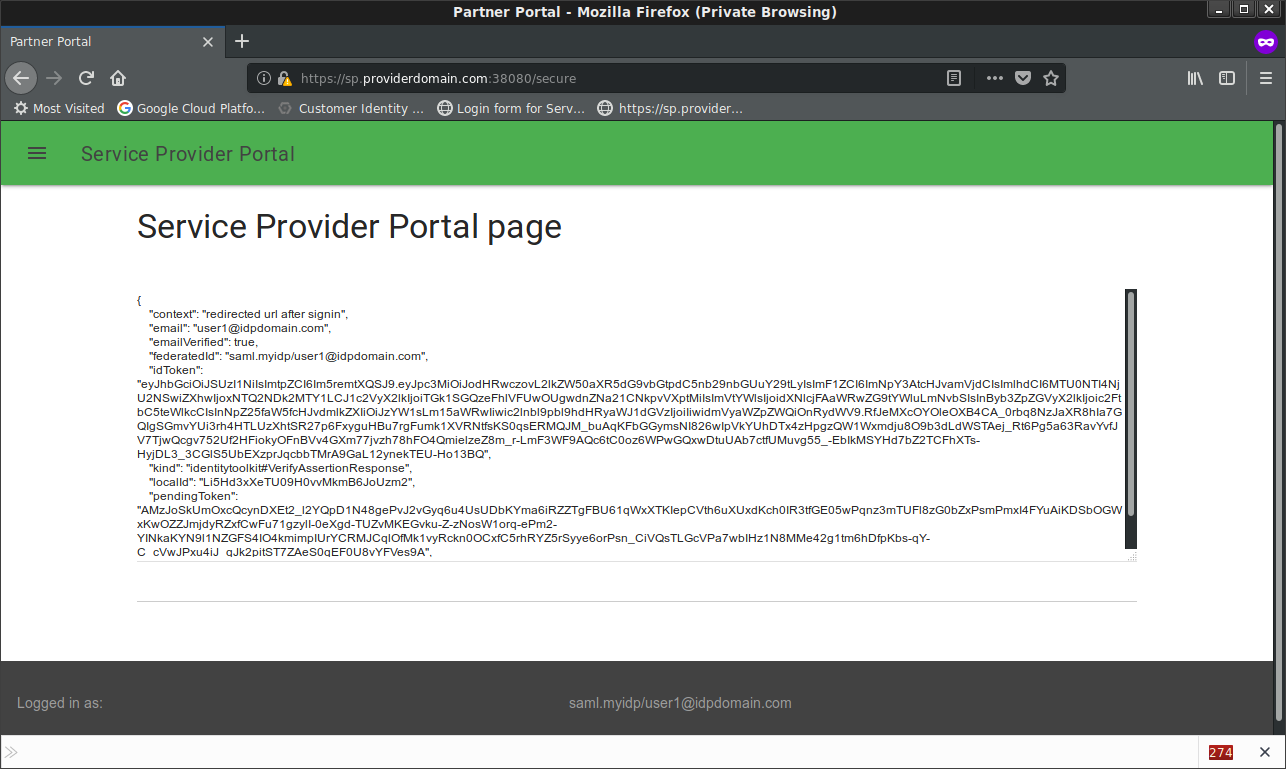
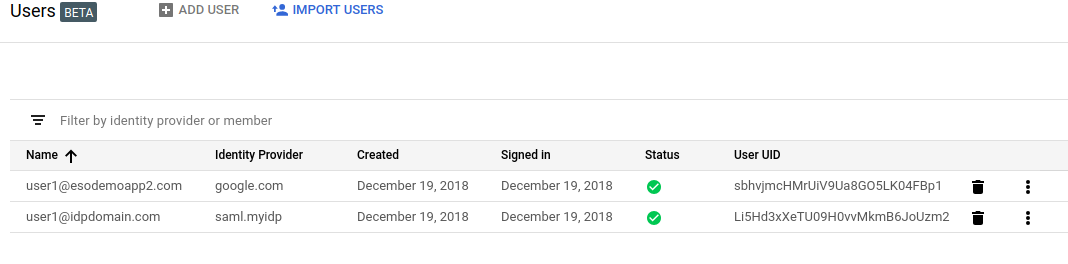
Note two users is provisioned per each login:
SP Scenario: Self hosted ACS
In this scenario, we will run our own IDP.
First step is to stop the SP from the previous step (SP Scenario: FirebaseSDK) if you are still running it.
Then use the API key, projectID and saml_providder for your setup and start the SP:
    cd sp/

      docker run -t -p 38080:38080 \
        -v `pwd`:/app/:ro \
        --entrypoint=/app/saml_sp.py \
        salrashid123/appssso \
        --debug  \
        --port=38080 \
        --saml_issuer=authn.py \
        --cert_file=/app/server.crt \
        --key_file=/app/server.key \
        --saml_provider_id=saml.myIdP \
        --projectId=226130788915  \
        --sp_domain=https://sp.providerdomain.com:38080 \
        --api_key=AIzaSyCgD_yHPgEoC52gY7KnSqe67e4B6ixo0c8
Ok, you still can’t run the full flow yet because we need to modify the ACS URL back to our own provider. By default, the ACS is
"callbackUri": "https://cicp-project.firebaseapp.com/__/auth/handler"
but we need it to point to our endpoint
"callbackUri": "https://sp.providerdomain.com:38080/acs"
Plese see the Appendix section on how to run through these steps.
Once youve done it, you can access the SP at: https://sp.providerdomain.com:38080/
At that point, you’ll get redirected once clicking on the button to same IDP as earlier.
Login and you’ll go back to the
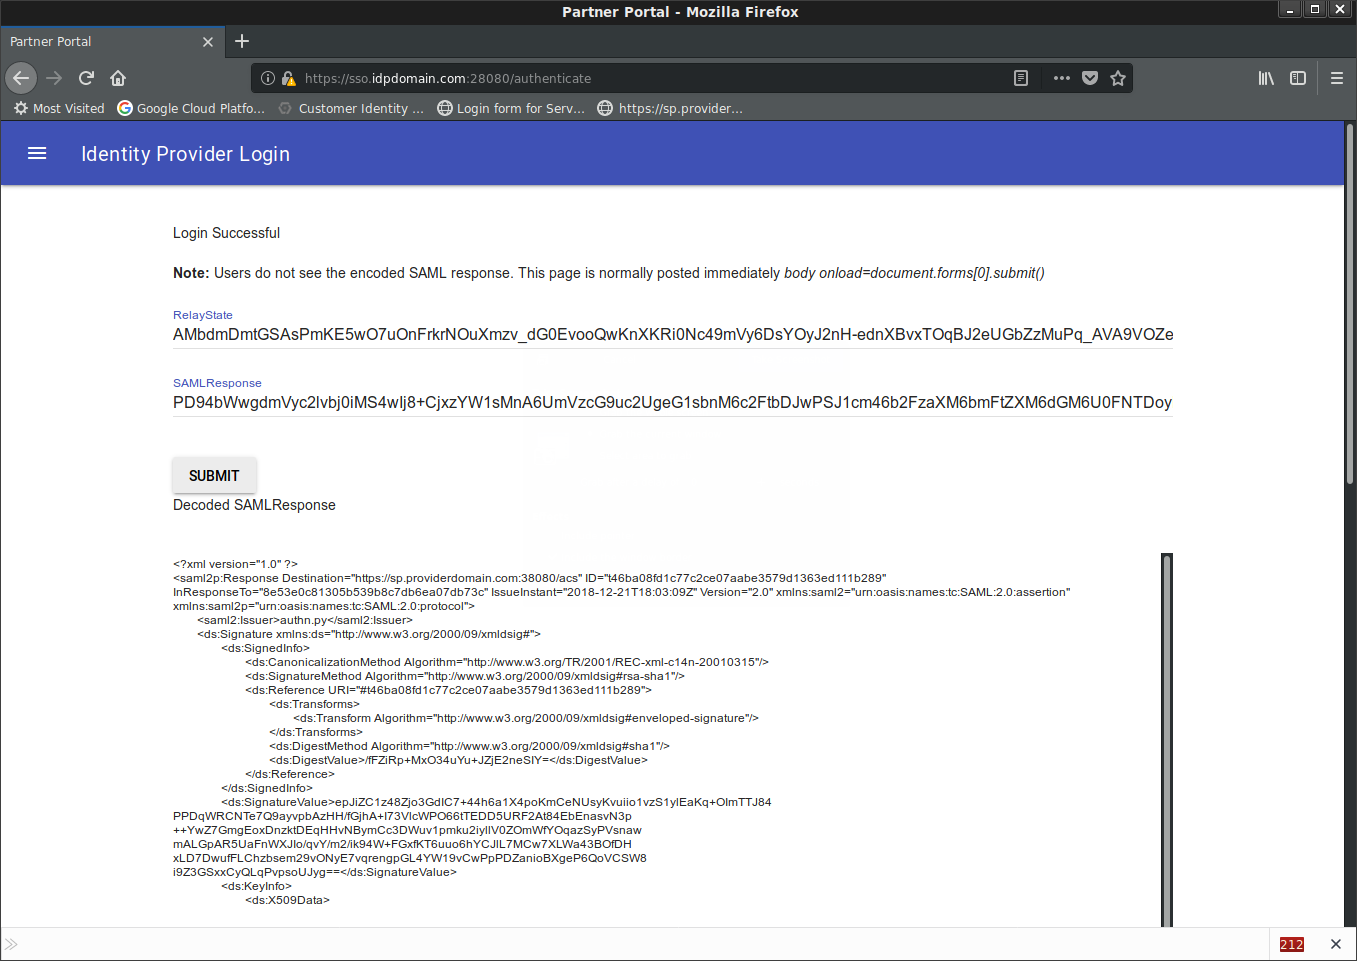
Note the saml2p:Response Destination= value
Custom Domain for FireBase SDK
By default when you setup CICP with FirebaseSDK, your ACS redirects you to a domain like "https://cicp-project.firebaseapp.com/__/auth/handler
However, you may want to setup a custom domain hosted on firebase. If you set up a custom hosted domain, firebase will automatically manage the redirect back to your app. THis works as long as you use the firebaseSDK for the SP.
To set this up, first setup “Firebase Hosting” and setup a custom domain. For me, it was sp.esodemoapp2.com (you ofcourse need to own the domain and edit the DNS settings, proper (the /etc/hosts trick wont work)). Once you set that up and provide the IPs they specify (wait maybe 1hr)
For my domain,
      $ nslookup sp.esodemoapp2.com

      Name:	sp.esodemoapp2.com
      Address: 151.101.65.195
      Name:	sp.esodemoapp2.com
      Address: 151.101.1.195

Then edit the javascript in sp_firebase/layout.html to add on the auth domain you have
      <script>
        var config = {
          apiKey: "AIzaSyCgD_yHPgEoC52gY7KnSqe67e4B6ixo0c8",
          //authDomain: "cicp-project.firebaseapp.com",
          authDomain: "sp.esodemoapp2.com"
        };
        firebase.initializeApp(config);
      </script>
You also need to update SAML CallbackURI manually as described in the appendix to https://sp.esodemoapp2.com/__/auth/handler.
Once all that is done, if you use the firebaseSDK scenario, the IDP will redirect you back to the domain above which intun will send you back to your site with an initialized firebase user
Thats all folks.
Appendix
PATCH SAMLConfig
The following procedure details how to update the SAMLConfig manually via API. At the moment, the UI does not allow you to modify the SAML ACS callback url so we need to update it via the API.
- To do this, we need to first get the admin service account for your firebase project (one should exist already)
    PROJECT_NAME=$(gcloud config list --format="value(core.project)")

    $ gcloud iam service-accounts list
    NAME                                EMAIL
    App Engine default service account  cicp-project@appspot.gserviceaccount.com
    firebase-adminsdk                   firebase-adminsdk-aujvr@cicp-project.iam.gserviceaccount.com
- Then get the key and activate it:
    gcloud iam service-accounts keys  create sp_firebase/svc_account.json --iam-account=firebase-adminsdk-aujvr@cicp-project.iam.gserviceaccount.com

    gcloud auth activate-service-account  firebase-adminsdk-aujvr@cicp-project.iam.gserviceaccount.com  --key-file=`pwd`/sp_firebase/svc_account.json
- Now get a token and the current config itno a file
    export TOKEN=$(gcloud auth print-access-token)

    curl -s -X GET -H 'Content-Type: application/json' -H "Authorization: Bearer $TOKEN" https://identitytoolkit.googleapis.com/v2beta1/projects/cicp-project/inboundSamlConfigs/saml.myidp > update_config.json
-
Your file should look something like this:
-
update_config.json
      {
        "name": "projects/cicp-project/inboundSamlConfigs/saml.myidp",
        "idpConfig": {
          "idpEntityId": "authn.py",
          "ssoUrl": "https://sso.idpdomain.com:28080/login",
          "idpCertificates": [
            {
              "x509Certificate": "-----BEGIN CERTIFICATE-----\nMIIDqTCCApGgAwIBAgIBBDANBgkqhkiG9w0BAQsFADBvMQswCQYDVQQGEwJVUzET\nMBEGA1UECBMKQ2FsaWZvcm5pYTEWMBQGA1UEBxMNTW91bnRhaW4gVmlldzEPMA0G\nA1UEChMGR29vZ2xlMRMwEQYDVQQLEwpFbnRlcnByaXNlMQ0wCwYDVQQDEwRNeUNB\nMB4XDTE4MTIxMzA1MTcyN1oXDTMyMDgyMTA1MTcyN1owZDELMAkGA1UEBhMCVVMx\nEzARBgNVBAgTCkNhbGlmb3JuaWExDzANBgNVBAoTBkdvb2dsZTETMBEGA1UECxMK\nRW50ZXJwcmlzZTEaMBgGA1UEAxMRc3NvLmlkcGRvbWFpbi5jb20wggEiMA0GCSqG\nSIb3DQEBAQUAA4IBDwAwggEKAoIBAQDSHLQ5sYOTCWKYtYcg1G8AUS5zs/K5gd9+\nB06+zo5y671R6Bzf4HX1onfpzWU0pMfE8r2geBiL7F2mMWxPsxdGRIm2DFDbpT51\nTlcwdS9E5ThALevqMNNL9YRMxZkaCBd9Zmt0Yw5OO4DnjdmtR1ZJd14PksrKd0FA\nTOMcx949ZhUtqGljaKR9DT+Pqvv+WW94aHYkOnXr+LA4BXj/+2ikkSlFFm1ZtP8J\nCDO0JmwPOeTRrxs3rDYisDBZJ4h11tvWHbruq8KqfAOnVYNtV8R2yHdMlBrphohQ\nWVgXeBtzRmm2wXMOYHpRUqzs36Mlzn2EE3lVv7yC/0SUadqoDfnpAgMBAAGjWzBZ\nMCwGCWCGSAGG+EIBDQQfFh1PcGVuU1NMIEdlbmVyYXRlZCBDZXJ0aWZpY2F0ZTAc\nBgNVHREEFTATghFzZXJ2ZXIuZG9tYWluLmNvbTALBgNVHQ8EBAMCBeAwDQYJKoZI\nhvcNAQELBQADggEBADoI8vUcEjdWVtSA6x82mNIoOilT9XLAXjKCcxG9S7+nrKc4\nvh/FunLgvGIel0qpJP3deVKiZqL8DwJMT0107I79h5TyMaVsGuxVqKhL7kC2BhZS\najf/KtXxk0FlEtYc8sqK6h5UQiwhN57StQuvowEJoKQZTnRixY3bC1Ul9b0NzNmv\nAwVpYaJZuofq0PPx5ivyxsHdMSBbG71QthIFY0Yne8kZDsDNyVwk3AlDXN4xz2fO\nKlFW5/wU8PSxuxImbu4FPjidlnMxNT8h34CrzBhfna4V8gjp4mEWRfedvLGDuZTi\nlzEsi+LxZMh83EyJqQ0PE1cOlvBpw0/5/N4NBuc=\n-----END CERTIFICATE-----"
            }
          ]
        },
        "spConfig": {
          "spEntityId": "sp.providerdomain.com",
          "callbackUri": "https://cicp-project.firebaseapp.com/__/auth/handler"
        },
        "displayName": "myIdP",
        "enabled": true
      }
-
Note the
"callbackUri": "https://cicp-project.firebaseapp.com/__/auth/handler"value (cicp-projectis the one i used, your project will be different). This is what we need to update- For FirebaseSDK (default):
"callbackUri": "https://cicp-project.firebaseapp.com/__/auth/handler" - For Non FirebaseSDK:
"callbackUri": "https://sp.providerdomain.com:38080/acs" - For FirebaseSDK with Custom Domain
"callbackUri": "https://sp.esodemoapp2.com/__/auth/handler"(or which ever is your custom domain as shown above)
- For FirebaseSDK (default):
-
Submit a
PATCHrequest to update
curl -i -X PATCH -d @update_config.json -H 'Content-Type: application/json' -H "Authorization: Bearer $TOKEN" https://identitytoolkit.googleapis.com/v2beta1/projects/cicp-project/inboundSamlConfigs/saml.myidp
OpenSSL Certificate
openssl req -x509 -newkey rsa:4096 -keyout server.key -out server.crt -days 365 -nodes
This site supports webmentions. Send me a mention via this form.