Kubernetes RBAC with Google Cloud Identity Platform/Firebase Tokens
2019-11-22Simple tutorial on how to setup Kubernetes RBAC with Google Cloud Identity Platform.
This tutorial does not cover setting up k8s RBAC for Google OIDC but rather with how to configure generic k8s with GCP’s Identity Platform’s Custom Tokens. If you are interested in Google OIDC login for k8s, please see the links in the references. Also, as of 12/18/19, GKE does not support defining your own OIDC provider so this article covers situation you want to use Identity Platform with a k8s server where you can specify the provider.
Identity Platform allows your users to login via any number of mechanims to your application: the well known OIDC providers, SAML, username/password, etc. No matter the login mechanism, you application can issue a Custom JWT token back to your users. Within that, you can login to firebase using signInWithCustomToken()) and then access select Firebase APIs directly. Well..what about using these tokens for kubernetes API access and RBAC?
Sure..whenever a Cloud Identity Platform project is generated, a partial OIDC endpoint is also generated which kubernetes or other applications can use to discover the odidc services and verify the token that identifies the user.
This tutorial sets minikube and Cloud Identity Platform as the provider. In addition, this tutorial demonstrates how to allow RBAC access based on user,groups, required Claims as well as an exec provider for kubectl.
This repo is NOT supported by google; caveat emptor
You can find the source here
Anyway, lets get started
I’m assuming you’ve read up on OIDC provider for kubernetes using a standard provider such as Google (see links below). If you did you’re probably wondering what i meant by partial in the intro….Well you can partially sic what i mean by looking at the /.well-known/openid-configuration for google or other providers. For example, compare:
accounts.google.com: https://accounts.google.com/.well-known/openid-configuration
vs a sample Google Cloud Identity Platform endpoint:
$ curl -s https://securetoken.google.com/$PROJECT_ID/.well-known/openid-configuration | jq '.'
{
  "issuer": "https://securetoken.google.com/$PROJECT_ID",
  "jwks_uri": "https://www.googleapis.com/service_accounts/v1/jwk/securetoken@system.gserviceaccount.com",
  "response_types_supported": [
    "id_token"
  ],
  "subject_types_supported": [
    "public"
  ],
  "id_token_signing_alg_values_supported": [
    "RS256"
  ]
}
Note that even the /token endpoint to refresh your credentials is missing used to refresh credentials. Identity Platform uses a different endpoint at https://developers.google.com/identity/toolkit/reference/securetoken/rest/v1/token which isn’t advertized on discovery url. We can still refresh the credentials but we need some custom auth plugin handling with kubectl.
Anyway, some homework/background
- Kubernetes OpenID Connect Tokens
- Kubernetes Master Configuration
- Google Cloud Identity
- Cloud Identity Custom Tokens
- STSJWK URL
Create New Project
because…you need one. export it as
export PROJECT_ID=`gcloud config get-value core/project`
-
Navigate to the Identity Platform Console: https://console.cloud.google.com/customer-identity/providers
Select “Project Settings on the top left” which will show the API key:
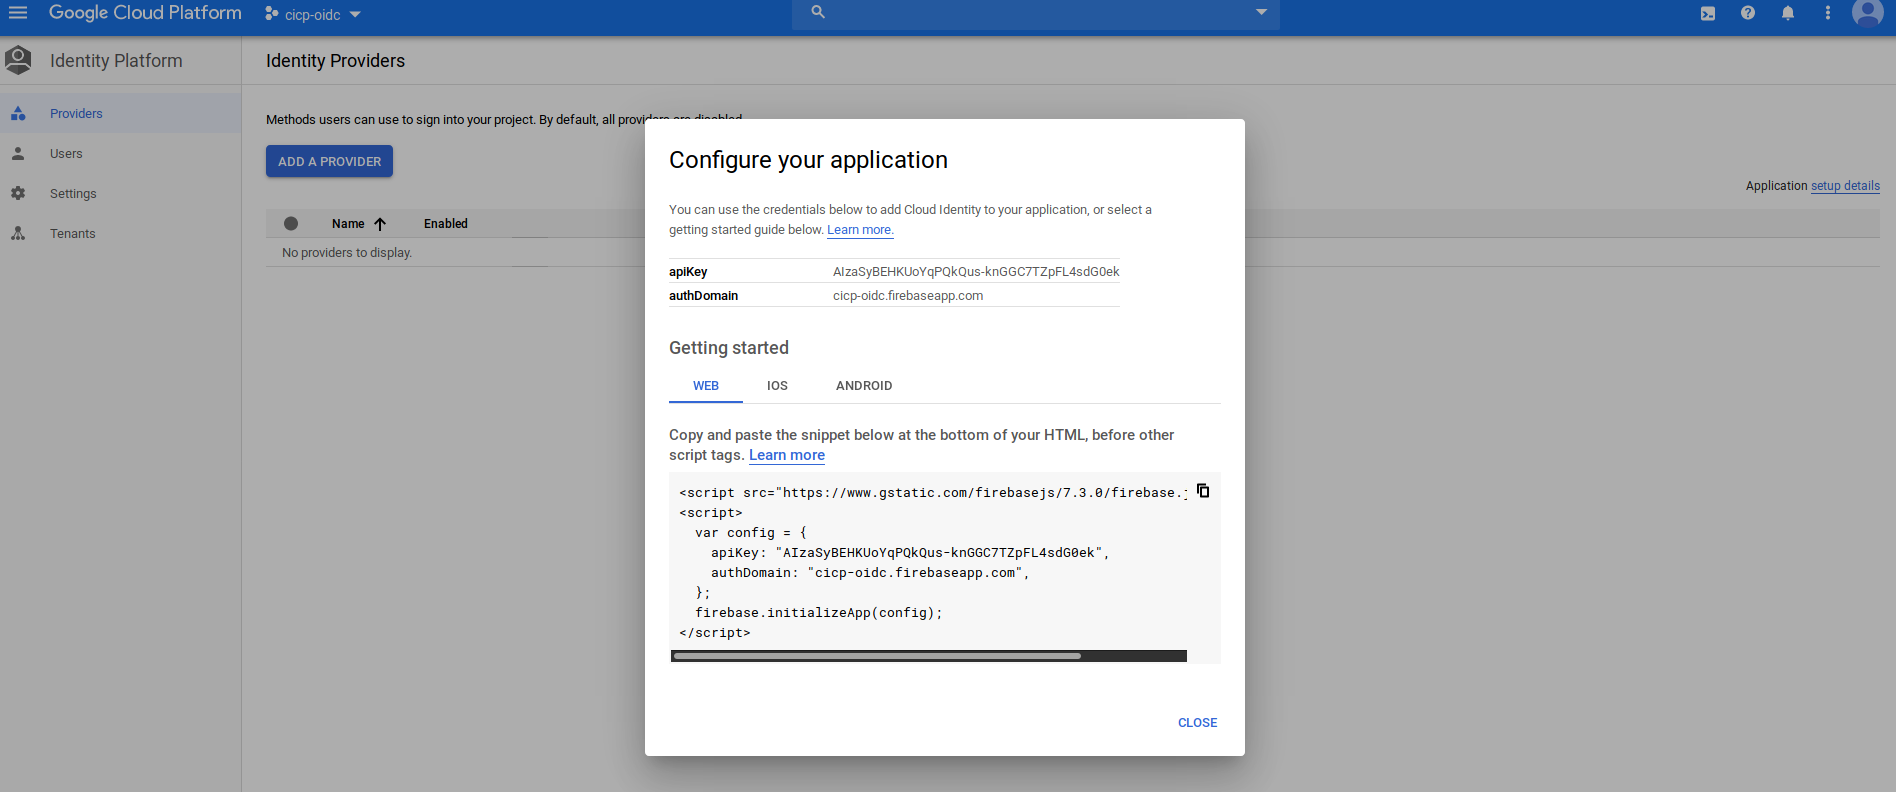
export the value
export API_KEY=AIzaSyBEHKUoYqPQkQus-reaacted
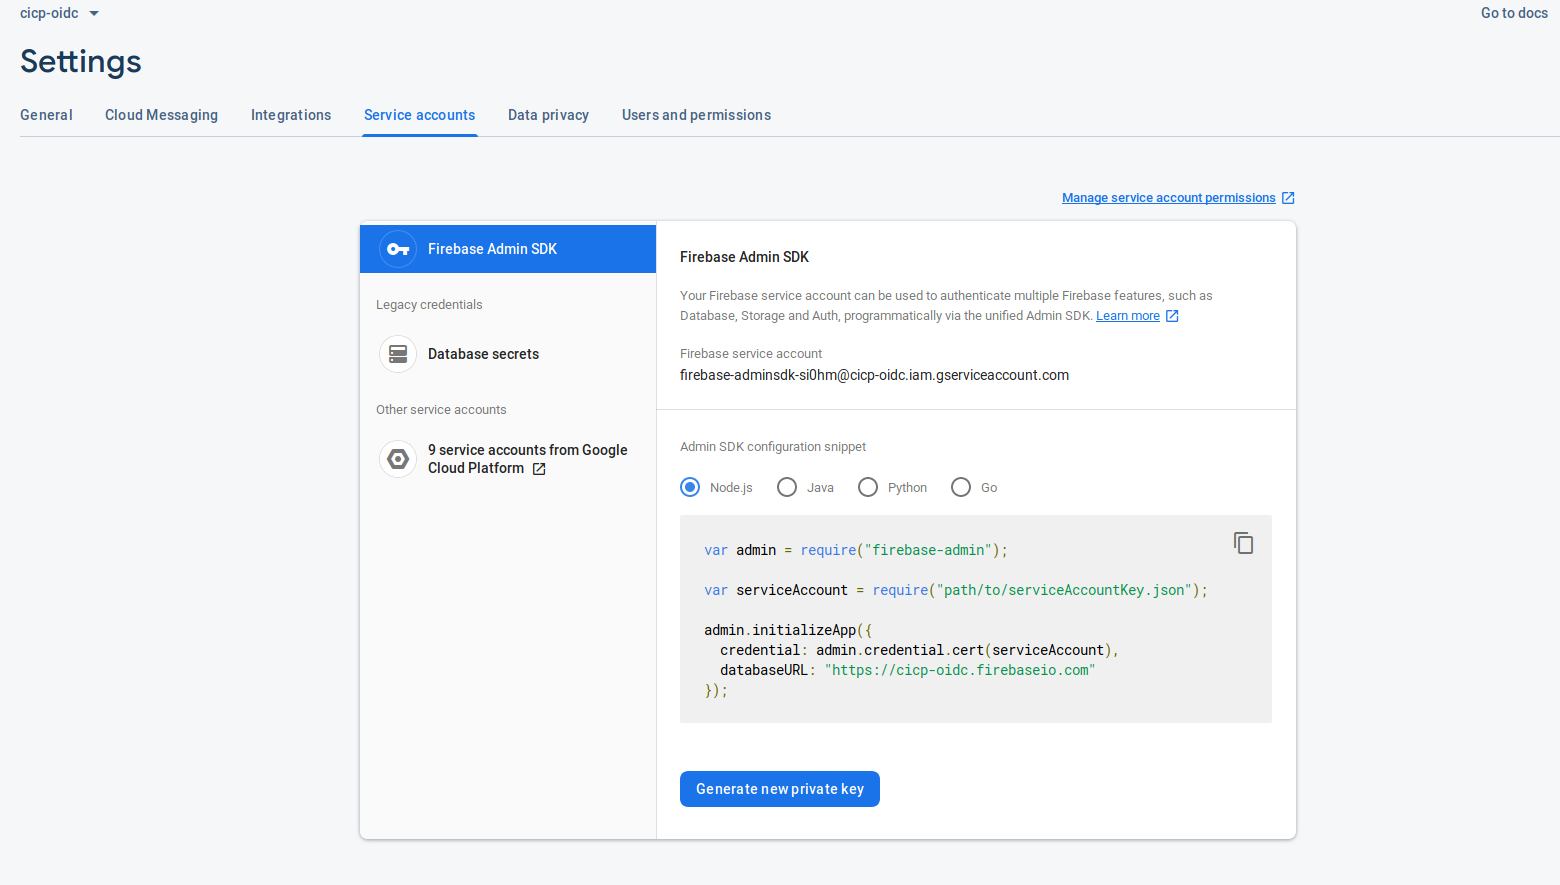
- Download the Firebase Service Account service account key
Since we are going to partially manage accounts using the Firebase SDK to setup the cliams, we need a service_account capable of interacting with Firebase users.
To do that, first download a the Firebase Service Account JSON file. Save that at svc_account.json
- Setup python client to get initial token
Included in this repo is a sample application which uses the service account to create a new user called alice as an Identity Platform user.
This script will also generate a Custom token ad then display id_token and refresh_token.
Later on, we will also setup a user (tim) with a permanent claim that is present in the default id_token provided by firebase login.
Finally, we will use this script later for the kubernetes auth plugin.
- Using Custom Tokens:
You will need python37, python-pip installed/
https://github.com/salrashid123/kubernetes_oidc_gcp_identity_platform.git
source env/bin/activate
pip install -r requirements.txt
Now run the script
$ python fb_token.py print $API_KEY alice
Getting custom id_token
FB Token for alice

eyJhbGciOiAiUlMyNTYiLCAidHlwIjogIkpXVCIsICJraWQiOiAiN2MwYmQyYzQ2NTExNjgwNzA2Mjk0ZTg4MmVmOTlmZTE2ZjZhZWUzNyJ9.eyJ1aWQiOiAiYWxpY2UiLCAiaXNzIjogImZpcmViYXNlLWFkbWluc2RrLXNpMGhtQGNpY3Atb2lkYy5pYW0uZ3NlcnZpY2VhY2NvdW50LmNvbSIsICJleHAiOiAxNTc2NjE1OTI5LCAiY2xhaW1zIjogeyJpc2FkbWluIjogInRydWUiLCAiZ3JvdXBzIjogWyJncm91cDEiLCAiZ3JvdXAyIl19LCAiaWF0IjogMTU3NjYxMjMyOSwgImF1ZCI6ICJodHRwczovL2lkZW50aXR5dG9vbGtpdC5nb29nbGVhcGlzLmNvbS9nb29nbGUuaWRlbnRpdHkuaWRlbnRpdHl0b29sa2l0LnYxLklkZW50aXR5VG9vbGtpdCIsICJzdWIiOiAiZmlyZWJhc2UtYWRtaW5zZGstc2kwaG1AY2ljcC1vaWRjLmlhbS5nc2VydmljZWFjY291bnQuY29tIn0.CFioojdpUDTOtNuYthygjL_XtHnNJmlhALH6DMSmdC2WpmRQ5iBBMhPPNWo5cMkdTblFPOCDcSEKbVjufFEHwi-6cCmXwskKByjD62uZWh5VTDS9fGBQ2rzfGyLL7U6RVIwRN9NXwexp_toEmII4mApXYfsfpdSaNMbSUEFwH7Q4L50COeec_hw18572CZY-BqcbCXu_1tFT05kf4Gj9YXIAyS5Fmuv_8zhM7BnNkXwjvJfXsp6n6m2Xr6MpkmnCaBb-FRMj2nwp4Top1akrd8fxaoBeshe-OrzJ0n5DRcTkdz0Ya78ZArIgXuJBmKYhuyCVVHZmUGqrUJnU6cXLMQ
-----------------------------------------------------

Getting STS id_token
STS Token for alice

ID TOKEN: eyJhbGciOiJSUzI1NiIsImtpZCI6ImQ3NjM1YWI2NDZlMDdmZDE5OWY3NGIwMTZhOTU0MzkyMmEwY2ZmOWEiLCJ0eXAiOiJKV1QifQ.eyJhZG1pbiI6dHJ1ZSwiaXNhZG1pbiI6InRydWUiLCJncm91cHMiOlsiZ3JvdXAxIiwiZ3JvdXAyIl0sImlzcyI6Imh0dHBzOi8vc2VjdXJldG9rZW4uZ29vZ2xlLmNvbS9jaWNwLW9pZGMiLCJhdWQiOiJjaWNwLW9pZGMiLCJhdXRoX3RpbWUiOjE1NzY2MTIzMjksInVzZXJfaWQiOiJhbGljZSIsInN1YiI6ImFsaWNlIiwiaWF0IjoxNTc2NjEyMzI5LCJleHAiOjE1NzY2MTU5MjksImZpcmViYXNlIjp7ImlkZW50aXRpZXMiOnt9LCJzaWduX2luX3Byb3ZpZGVyIjoiY3VzdG9tIn19.dzwH1FXg_wjpzQPinZ6lQ5BpG4ZDUMhovxCtiuSyJxERWh_mcvwQtnkRE5mFZUYFMmb0hDJn_fp90ky5Kg5_W43eqfTL2_lwNMXC1hLyVZj0mJC5aSaMXnsHgEoOtUumq4afr21dn2URL8AY9uybWT-Icq_gC7cVxas9B2nnLTdRw7_MnlNF5nLk8zQ-bC1eLGamax3DLyF7bTN2n9KG3M-vKTuMXwKYlAlIr8btE5esYPt_jeQH-hUTE-NsRbbtVC0IE6qlou23QJb8WMGOwMPe0C91WhBfHOXXLt9fEznmMto-OTWBYY-quBjTMoFbz9UT61K6JtD-6Xf8pKzj0Q
-------
refreshToken TOKEN: AEu4IL3yZ96DibHhf54Jv--redacted
Verified User alice
The script will display two tokens:
the first FB Token is simply a self-signed JWT issued by the service account. Decoded (at `jwt.io)
{
  "uid": "alice",
  "iss": "firebase-adminsdk-si0hm@cicp-oidc.iam.gserviceaccount.com",
  "exp": 1573544650,
  "claims": {
    "isadmin": "true",
    "groups": [
      "group1",
      "group2"
    ]
  },
  "iat": 1573541050,
  "aud": "https://identitytoolkit.googleapis.com/google.identity.identitytoolkit.v1.IdentityToolkit",
  "sub": "firebase-adminsdk-si0hm@cicp-oidc.iam.gserviceaccount.com"
}
The second token is the one we’re interested in. This is the STS token signed by google which we will use. Note the iss: field.
{
  "isadmin": "true",
  "groups": [
    "group1",
    "group2"
  ],
  "iss": "https://securetoken.google.com/cicp-oidc",
  "aud": "cicp-oidc",
  "auth_time": 1573541050,
  "user_id": "alice",
  "sub": "alice",
  "iat": 1573541050,
  "exp": 1573544650,
  "firebase": {
    "identities": {},
    "sign_in_provider": "custom"
  }
}
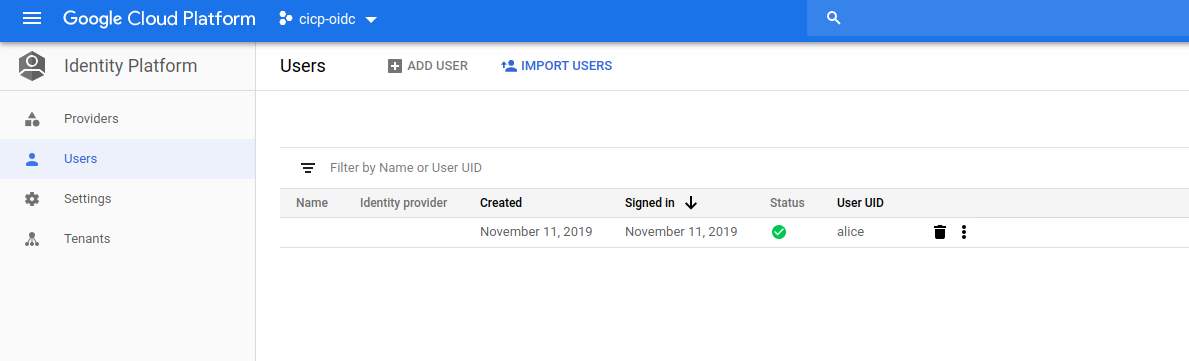
Also note that alice now exists in Identity Platform:
Export the STS token and Refresh Tokens
$ export TOKEN=<value>

$ export REFRESH_TOKEN=<value>
- Using Default Tokens
If you want to add permanent claims to a user, you can invoke auth.set_custom_user_claims() api endpoint through firebase itself.
What that api will do is associate a claim you choose to the user and when the user gets their default Firebase id_token (which they will get when they login), that claim will be present always. You do not have to create a custom token with this mechanism: once you set this up, any id_token the user is given by the act of logging in will have that claim already:
The API which we will use in this variation is:
firebase_admin.auth.set_custom_user_claims(uid, custom_claims, app=None)
Sets additional claims on an existing user account.
For example, to associate ‘admin=true’ claim permanently to an account ’tim` that already exists, invoke:
$  python fb_token.py claim $API_KEY tim

{'_data': {u'localId': u'tim', u'lastLoginAt': u'1576609070680', u'customAuth': True, u'customAttributes': u'{"admin": true}', u'lastRefreshAt': u'2019-12-17T18:57:50.680Z', u'createdAt': u'1576609070680'
Now when tim logs into firebase itself later on, the idToken that gets returned via Firebase
    firebase.auth().onAuthStateChanged(function(user) {
      if (user) {
        console.log(user);
        firebase.auth().currentUser.getIdToken(true).then(function(idToken) {
          console.log(idToken);
will have the claim in it already:
{
  "admin": true,
  "iss": "https://securetoken.google.com/cicp-oidc",
  "aud": "cicp-oidc",
  "auth_time": 1576611882,
  "user_id": "tim",
  "sub": "tim",
  "iat": 1576611976,
  "exp": 1576615576,
  "firebase": {
    "identities": {},
    "sign_in_provider": "custom"
  }
}
And ofcourse you can print the default token tim has. (note, if we did not run claim api as we did previously, the two additional custom claims will not be present)
$ python fb_token.py print $API_KEY tim
You can use either the Custom or Defult token in the next step
- Start Minikube with RBAC,OIDC configurations
$ minikube start --vm-driver=kvm2     \
      --bootstrapper=kubeadm \
      --extra-config=apiserver.authorization-mode=RBAC \
      --extra-config=apiserver.oidc-issuer-url=https://securetoken.google.com/$PROJECT_ID \
      --extra-config=apiserver.oidc-username-claim=sub \
      --extra-config=apiserver.oidc-client-id=$PROJECT_ID \
      --extra-config=apiserver.oidc-username-prefix=- \
      --extra-config=apiserver.oidc-groups-claim=groups \
      --extra-config=apiserver.oidc-required-claim=isadmin=true
I’m using kvm2 (you can ofcourse use any driver you want)
- Verify k8s API access
Use curl to verify that anonymous/authenticated users can’t access any api:
$ export MINIKUBE_IP=`minikube ip`

$ curl -s --cacert $HOME/.minikube/ca.crt  https://$MINIKUBE_IP:8443/api/v1/nodes
{
  "kind": "Status",
  "apiVersion": "v1",
  "metadata": {

  },
  "status": "Failure",
  "message": "nodes is forbidden: User \"system:anonymous\" cannot list resource \"nodes\" in API group \"\" at the cluster scope",
  "reason": "Forbidden",
  "details": {
    "kind": "nodes"
  },
  "code": 403
}
As well as alice using the token:
$ curl -s --cacert $HOME/.minikube/ca.crt  -H "Authorization: Bearer $TOKEN" https://$MINIKUBE_IP:8443/api/v1/nodes
{
  "kind": "Status",
  "apiVersion": "v1",
  "metadata": {

  },
  "status": "Failure",
  "message": "nodes is forbidden: User \"alice\" cannot list resource \"nodes\" in API group \"\" at the cluster scope",
  "reason": "Forbidden",
  "details": {
    "kind": "nodes"
  },
  "code": 403
}
- Apply RBAC policies
Now allow a role/rolebinding that will give access in the following way:
User: alicecan list pods- Members of
Group: groupcan list nodes - All users that access the k8s API must have claim
isadmin: true
$ kubectl apply -f rolebinding.yaml -f clusterrole.yaml
    clusterrolebinding.rbac.authorization.k8s.io/pod-reader-binding created
    clusterrolebinding.rbac.authorization.k8s.io/node-reader-binding created
    clusterrole.rbac.authorization.k8s.io/pod-reader created
    clusterrole.rbac.authorization.k8s.io/node-reader created
- Check Access to API
Now try to access pods and nodes as alice using curl
$ curl -s --cacert $HOME/.minikube/ca.crt  -H "Authorization: Bearer $TOKEN" https://$MINIKUBE_IP:8443/api/v1/namespaces/default/pods
{
  "kind": "PodList",
  "apiVersion": "v1",
  "metadata": {
    "selfLink": "/api/v1/namespaces/default/pods",
    "resourceVersion": "905"
  },
  "items": []
}

$ curl -s --cacert $HOME/.minikube/ca.crt  -o /dev/null  -w "%{http_code}\n" -H "Authorization: Bearer $TOKEN" https://$MINIKUBE_IP:8443/api/v1/nodes
200
woooo!
- Configure
kubectl
The easiest way to use kubectl to manage resoruces is to directly specify the token we’ve got without doing anything else
kubectl get po --token=$TOKEN
but…now we gotta add in the token all the time and manage it always…lets configure kubectl itself.
The default configurations you are usually using when dealing with GKE or kubernetes is with one of the standard auth plugins:
While this tutorial is about OIDC, we really can’t use that default configuration because of the missing /token endpoint and the way its used. We need to workaround this with a custom auth adapter that actually just returns the token to kubectl automatically (and refreshes it).
The script fb_token.py when used with the switch refresh $REFRESH_TOKEN $TOKEN will return a particular JSON string which kubectl understands as a valid credential token to use.
Basically, it implements ExecCredential (proto
so how do we configure kubectl…you can either
a) “just edit” ~/.kube/config and add in lines like the following as user alice:
users:
- name: alice
  user:
    exec:
      command: /usr/bin/python
      apiVersion: "client.authentication.k8s.io/v1beta1"
      env:
      - name: "FOO"
        value: "bar"
      args:
      - "/path/to/fb_token.py"
      - "refresh"
      - $API_KEY
      - $TOKEN
(ofcourse replace with the actual values of the env-vars)
b) Get a recent version of kubectl that implements the ability to configure the exec adapter via kubectl #3230
then run:
$ kubectl config set-credentials alice \
     --exec-api-version="client.authentication.k8s.io/v1beta1" \
     --exec-command="/usr/bin/python" \
     --exec-env="foo=bar" \
     --exec-env="GOOGLE_APPLICATION_DEFAULT=not_used" \
     --exec-arg="/path/to/fb_token.py","refresh","$REFRESH_TOKEN","$TOKEN"
ok, you can view the .kube/config file to see if the substitution values are set.
- Use kubectl
$ kubectl get po --user="alice"
No resources found in default namespace.

$ kubectl get no --user="alice"
NAME       STATUS   ROLES    AGE   VERSION
minikube   Ready    master   13h   v1.14.0

$ kubectl get svc --user="alice"
Error from server (Forbidden): services is forbidden: User "alice" cannot list resource "services" in API group "" in the namespace "default"
If you want, set -v=10 to see all the gory details
- Remove access to test:
$ kubectl delete -f clusterrole.yaml
Verify the RBAC roles deny access.
$ kubectl get po --user="alice"
Error from server (Forbidden): pods is forbidden: User "alice" cannot list resource "pods" in API group "" in the namespace "default"
Note, fb_token.py does not send back the Expiration time for the token…thats ok for now because if kubectl will continue to use the current token until it sees a 401 at which point the exec script will get called. Also note the refresh_token never expires (unless revoked externally).
moar references
- Google OIDC with k8s RBAC Tutorials:
- STS JWK URL: https://www.googleapis.com/robot/v1/metadata/jwk/securetoken@system.gserviceaccount.com
Known Issues
In the course of testing, i found some things i had to account for or workaround:
- Using
--extra-config=apiserver.oidc-username-prefix=-
If I did not null the prefix, kubernetes prepended the issuer-url to the userID (presumably to disambiguate and for namespacing; i’m not sure). Anyway, i worked around that by just setting it to - which in the docs would prevent this behavior. You do not have to do this with other OIDC providers so.
{
  "kind": "Status",
  "apiVersion": "v1",
  "metadata": {

  },
  "status": "Failure",
  "message": "pods is forbidden: User \"https://securetoken.google.com/fabled-ray-104117#alice\" cannot list resource \"pods\" in API group \"\" in the namespace \"default\"",
  "reason": "Forbidden",
  "details": {
    "kind": "pods"
  },
  "code": 403
}
- Boolean values for
apiserver.oidc-required-claim
I initially set a custom claim as boolean in the JWT: isadmin: true. However, kubernetes didn’t seem to like that so i set it up as a string
{"log":"E1112 03:45:48.070398  1 authentication.go:65]
     Unable to authenticate the request due to an error: [invalid bearer token, oidc: parse claim isadmin: json:
     cannot unmarshal bool into Go value of type string]\n","stream":"stderr","time":"2019-11-12T03:45:48.070786233Z"
}
This site supports webmentions. Send me a mention via this form.