Decoding WireGuard with WireShark
2022-03-20I’ve never used WireGuard and infact didn’t even know what it was really until yesterday.
This article is a “helloworld” for the new (to me) VPN hotness that is WireGuard with some old-school protocol utility that is Wireshark.
Wireshark is great..it allows you do see things otherwise opaque and even over encrypted.
What i wanted to do is to see the full decrypted stack for WireGuard traffic….the hard way.
Why did i even do this?
The only way i really learn something is to try it out first hand..otherwise, its just pictures and too abstract and i’d just as easily forget it exists.
Writing something down, trying it out adds a bit of permanence for me.
Whats even better is if try to integrate it into something else that i know. The act of doing that next step seals it to an anchor i’d remember more.
So, in this article, we will:
- setup
WireGuardfor a client-server system - configure and run
nginxon the server - start
tcpdumpon the server - log the encryption keys on the server that is used in a wireguard session
- send curl traffic from
client->server - decrypt the
WireGuardtcpdump session usingWireShark
We’ll ultimately use WireSharks’ wireguard dissector and log the keys on the server using the wireguard Handshake key extraction utility. The utility dumps the keys in a specific Key Log Format which we will supply to WireShark for dissection.
For more information, see WireShark-WireGuard Decryption
Ultimately, we’ll see a full protocol stack fully decoded like this:
a stack of pancakes
Ofcourse if you are on the sever and wanted to see the decrypted traffic, just use the wireguard’s interface directly…it already decrypted for you! This article is really just academic.
Setup WireGuard Client-Server
Lets get started…i’m using Google Cloud VMs here for the client and server.
You can use any debian 10 system you want:
- Create Instances
gcloud compute  instances create   w-server  \
      --zone=us-central1-a --machine-type=n1-standard-1 \
      --tags wserver  \
      --no-service-account  --no-scopes  \
      --image=debian-10-buster-v20220310 --image-project=debian-cloud

gcloud compute  instances create   w-client  \
      --zone=us-central1-a --machine-type=n1-standard-1 \
      --tags wclient  \
      --no-service-account  --no-scopes  \
      --image=debian-10-buster-v20220310 --image-project=debian-cloud

# setup a firewall rule to allow UDP to the server
gcloud compute firewall-rules create allow-wg-udp \
  --action=ALLOW --rules=udp:51820 \
  --source-ranges=0.0.0.0/0 --target-tags=wserver
Server
On the Server, install WireGuard
root@w-server:~$ gcloud compute ssh w-server

root@w-server:~$ sudo su -
root@w-server:~$ apt-get update

root@w-server:~$ uname -a
   Linux w-server 4.19.0-18-cloud-amd64 #1 SMP Debian 4.19.208-1 (2021-09-29) x86_64 GNU/Linux

# Install Wireguard ([ref](https://www.wireguard.com/install/))
root@w-server:~$ apt install wireguard linux-headers-$(uname -r)

root@w-server:~$ modprobe wireguard
root@w-server:~$ lsmod | grep wireguard
    wireguard             225280  0
    ip6_udp_tunnel         16384  1 wireguard
    udp_tunnel             16384  1 wireguard
Then Generate keys for the server
root@w-server:~$ wg genkey | tee wg-private.key | wg pubkey > wg-public.key

# the keys used in this example:
root@w-server:~$ cat wg-public.key
eJMuhwf/DleRZ8dVWFKpLu1JtaShSv/yVMn4vh9Q8RY=

root@w-server:~$ cat wg-private.key
EPRc4jRSKgP1JKzjS11XAGTeOr/KomW9LmBDJ4jLlEk=
Create wireguard configuration for the server
create /etc/wireguard/wg0.conf
# define the WireGuard service
[Interface]

Address = 10.0.2.1/24

# contents of file wg-private.key that was recently created
PrivateKey = EPRc4jRSKgP1JKzjS11XAGTeOr/KomW9LmBDJ4jLlEk=

# UDP service port; 51820 is a common choice for WireGuard
ListenPort = 51820

#[Peer]
#PublicKey = WsLevjVjf6+SxH2Y4AkzRvNTkcb0lPZWufRkNVckWGc=
#AllowedIps = 10.0.2.2/24
Note that i’ve commented out the [Peer] we’ll come back to that later…
For now, start Wire service
root@w-server:~$ systemctl start wg-quick@wg0
root@w-server:~$ systemctl status wg-quick@wg0
root@w-server:~$ systemctl status wg-quick@wg0
● wg-quick@wg0.service - WireGuard via wg-quick(8) for wg0
   Loaded: loaded (/lib/systemd/system/wg-quick@.service; disabled; vendor preset: enabled)
   Active: active (exited) since Sun 2022-03-20 19:00:02 UTC; 1s ago
     Docs: man:wg-quick(8)
           man:wg(8)
           https://www.wireguard.com/
           https://www.wireguard.com/quickstart/
           https://git.zx2c4.com/wireguard-tools/about/src/man/wg-quick.8
           https://git.zx2c4.com/wireguard-tools/about/src/man/wg.8
  Process: 12958 ExecStart=/usr/bin/wg-quick up wg0 (code=exited, status=0/SUCCESS)
 Main PID: 12958 (code=exited, status=0/SUCCESS)

Mar 20 19:00:02 w-server systemd[1]: Starting WireGuard via wg-quick(8) for wg0...
Mar 20 19:00:02 w-server wg-quick[12958]: [#] ip link add wg0 type wireguard
Mar 20 19:00:02 w-server wg-quick[12958]: [#] wg setconf wg0 /dev/fd/63
Mar 20 19:00:02 w-server wg-quick[12958]: [#] ip -4 address add 10.0.2.1/24 dev wg0
Mar 20 19:00:02 w-server wg-quick[12958]: [#] ip link set mtu 1380 up dev wg0
Mar 20 19:00:02 w-server systemd[1]: Started WireGuard via wg-quick(8) for wg0.

root@w-server:~$ wg show wg0
    interface: wg0
    public key: eJMuhwf/DleRZ8dVWFKpLu1JtaShSv/yVMn4vh9Q8RY=
    private key: (hidden)
    listening port: 51820

# stop the service for now until we configure the client
root@w-server:~$ systemctl stop wg-quick@wg0
Install nginx and some other stuff which we’ll need later
root@w-server:~$ apt-get install nginx tcpdump wget gcc make git -y
root@w-server:~$ service nginx start
Client
Install WireGuard on the client pretty much the same way as the server with a small difference in the keys and peers used:
$ gcloud compute ssh w-client

root@w-client:~$ sudo su -
root@w-client:~$ apt-get update

root@w-client:~$ uname -a
   Linux w-server 4.19.0-18-cloud-amd64 #1 SMP Debian 4.19.208-1 (2021-09-29) x86_64 GNU/Linux

# Install Wireguard ([ref](https://www.wireguard.com/install/))
root@w-client:~$ apt install wireguard linux-headers-$(uname -r)

root@w-client:~$ modprobe wireguard
root@w-client:~$ lsmod | grep wireguard
    wireguard             225280  0
    ip6_udp_tunnel         16384  1 wireguard
    udp_tunnel             16384  1 wireguard
Generate keys:
root@w-client:~$ wg genkey | tee wg-private.key | wg pubkey > wg-public.key

root@w-client:~$ cat wg-public.key
WsLevjVjf6+SxH2Y4AkzRvNTkcb0lPZWufRkNVckWGc=

root@w-client:~$ cat wg-private.key
oPRSdFe82IZVnblzGl4G8oqLweQtF3qNpFCJCrAanGQ=
Before proceeding, on your laptop, get the server’s visible/external IP address (atleast the IP address the client can connect to)
$ gcloud compute instances list w-server
NAME      ZONE           MACHINE_TYPE   PREEMPTIBLE  INTERNAL_IP  EXTERNAL_IP    STATUS
w-server  us-central1-a  e2-medium                  10.128.0.14  34.132.181.215  RUNNING
On the client create /etc/wireguard/wg0.conf
and set the Endpoint address (your one will be different!)
# define the local WireGuard interface (client)
[Interface]

# contents of wg-private-client.key
PrivateKey = oPRSdFe82IZVnblzGl4G8oqLweQtF3qNpFCJCrAanGQ=

# the IP address of this client on the WireGuard network
Address=10.0.2.2/24

# define the remote WireGuard interface (server)
[Peer]

# from `sudo wg show wg0`
PublicKey = eJMuhwf/DleRZ8dVWFKpLu1JtaShSv/yVMn4vh9Q8RY=

# the IP address of the server on the WireGuard network
AllowedIPs = 10.0.2.1/24

# public IP address and port of the WireGuard server
Endpoint = 34.132.181.215:51820

PersistentKeepalive = 20
Start and check if things are running so far:
root@w-client:~$ systemctl start wg-quick@wg0
root@w-client:~$ systemctl status wg-quick@wg0

root@w-client:~$ wg show wg0
root@w-client:~$ systemctl stop wg-quick@wg0
Reconfigure Server
Back on the server, edit /etc/wireguard/wg0.conf and set the PublicKey and AllowdIps value for the clients.
[Interface]
Address = 10.0.2.1/24

# contents of file wg-private.key that was recently created
PrivateKey = EPRc4jRSKgP1JKzjS11XAGTeOr/KomW9LmBDJ4jLlEk=

# UDP service port; 51820 is a common choice for WireGuard
ListenPort = 51820

[Peer]
PublicKey = WsLevjVjf6+SxH2Y4AkzRvNTkcb0lPZWufRkNVckWGc=
AllowedIps = 10.0.2.2/24
Restart WireGuard
root@w-server:~$ systemctl start wg-quick@wg0
Connect Client->Server
On the client, check if you can connect using the internal/VPN/private IP 10.0.2.1
# on client
root@w-client:~$ curl -s -w "%{http_code}\n"  -o /dev/null  http://10.0.2.1
200
ok…now w’ere finally ready to capture traffic.
Stop both client and server
# Stop Server
root@w-server:~$ systemctl stop wg-quick@wg0
# Stop Client
root@w-client:~$ systemctl stop wg-quick@wg0
Compile WireGuard handshake extractor
The whole thing this tutorial revolves around is getting the ephemeral keys used by WireGuard during the encrypted session.
To do this, we will be using a utility function WireGuard Handshake Key Extractor
Lets get the utility
root@w-server:~$ cd
root@w-server:~$ mkdir extract
root@w-server:~$ cd extract
root@w-server:~$ git clone https://git.zx2c4.com/WireGuard
root@w-server:~$ cd WireGuard/contrib/examples/extract-handshakes
root@w-server:~$ make
Try to run it
# ./extract-handshakes.sh
./extract-handshakes.sh: line 46: echo: write error: No such file or directory
ruh roh..
Why? …the script is basically barfing on this line 46:
echo "p:wireguard/idxadd index_hashtable_insert ${ARGS[*]}" >> /sys/kernel/debug/tracing/kprobe_events
whats the deal..i didn’t know myself until is this post here which points out the problem with assuming the symbols…
sure enough, on my system its called wg_index_hashtable_insert
# cat /proc/kallsyms | grep wg_index_hashtable_insert
ffffffffc03d0e30 t wg_index_hashtable_insert	[wireguard]
so edit the file and set the line to read
echo "p:wireguard/idxadd wg_index_hashtable_insert ${ARGS[*]}" >> /sys/kernel/debug/tracing/kprobe_events
now run it again
./extract-handshakes.sh
(um…no output…thats better than it barfing but it just means it (should be) listening)
Stop WireGuard
Stop Wireguard on both the client and server so we can capture the original keyset.
Don’t worry about the script we just started, it’ll continue.
# Server
root@w-server:~$ systemctl stop wg-quick@wg0
# Client
root@w-client:~$ systemctl stop wg-quick@wg0
Capture Traffic on Network Interfaces
We’re going to now capture the traffic we can decode..
Server
ok, now , open up TWO new ssh sessions to to wg-server and begin to capture traffic
# restart server (keep the client down)
root@w-server:~$ systemctl start wg-quick@wg0
## begin capture, in one shell
tcpdump -s0 -iens4 -w /tmp/e.cap -f 'udp port 51820'
## in the other
tcpdump -s0 -iwg0 -w /tmp/w.cap -f 'tcp port 80'
these two capture files look at different interfaces…
wg0is wireguard, our expectation is this will ‘just show’ the decrypted trafficens4is the ethernet port on the VM…we expect this to show the encrypted traffic
Client
Now start the client
# restart
root@w-client:~$ systemctl start wg-quick@wg0
The moment you did this, you should see key exchanges on the extractor
# ./extract-handshakes.sh
New handshake session:
  PRESHARED_KEY = AAAAAAAAAAAAAAAAAAAAAAAAAAAAAAAAAAAAAAAAAAA=
  LOCAL_STATIC_PRIVATE_KEY = EPRc4jRSKgMA9SSs40tdV2TeOr/KomW9LmBDJ4jLlEk=
  REMOTE_STATIC_PUBLIC_KEY = WsLevjVjf6+SxH2Y4AkzRvNTkcb0lPZWufRkNVckWGc=
  LOCAL_EPHEMERAL_PRIVATE_KEY = yCIxv4JHNumm86PwhleTFusKpWro64MpJfmLt0CdgEM=
These are thew keys wireguard used with the client…we’ll need this later
Send traffic from the client=>server
curl -s -w "%{http_code}\n"  -o /dev/null  http://10.0.2.1
200
Stop capture by cancellin gout the e tcpdump sequences you started earlier
Decode with WireShark
We’re now going to decode the wireguard traffic using the keys and dump fils
Copy TCPTraces to the VM
Copy the tcpdump traces back to your laptop
$ gcloud compute scp w-server:/tmp/w.cap .
$ gcloud compute scp w-server:/tmp/e.cap .
Display WireGuard Interface traffic
Start wireshark and look at the wireguard interface:
wireshark w.cap
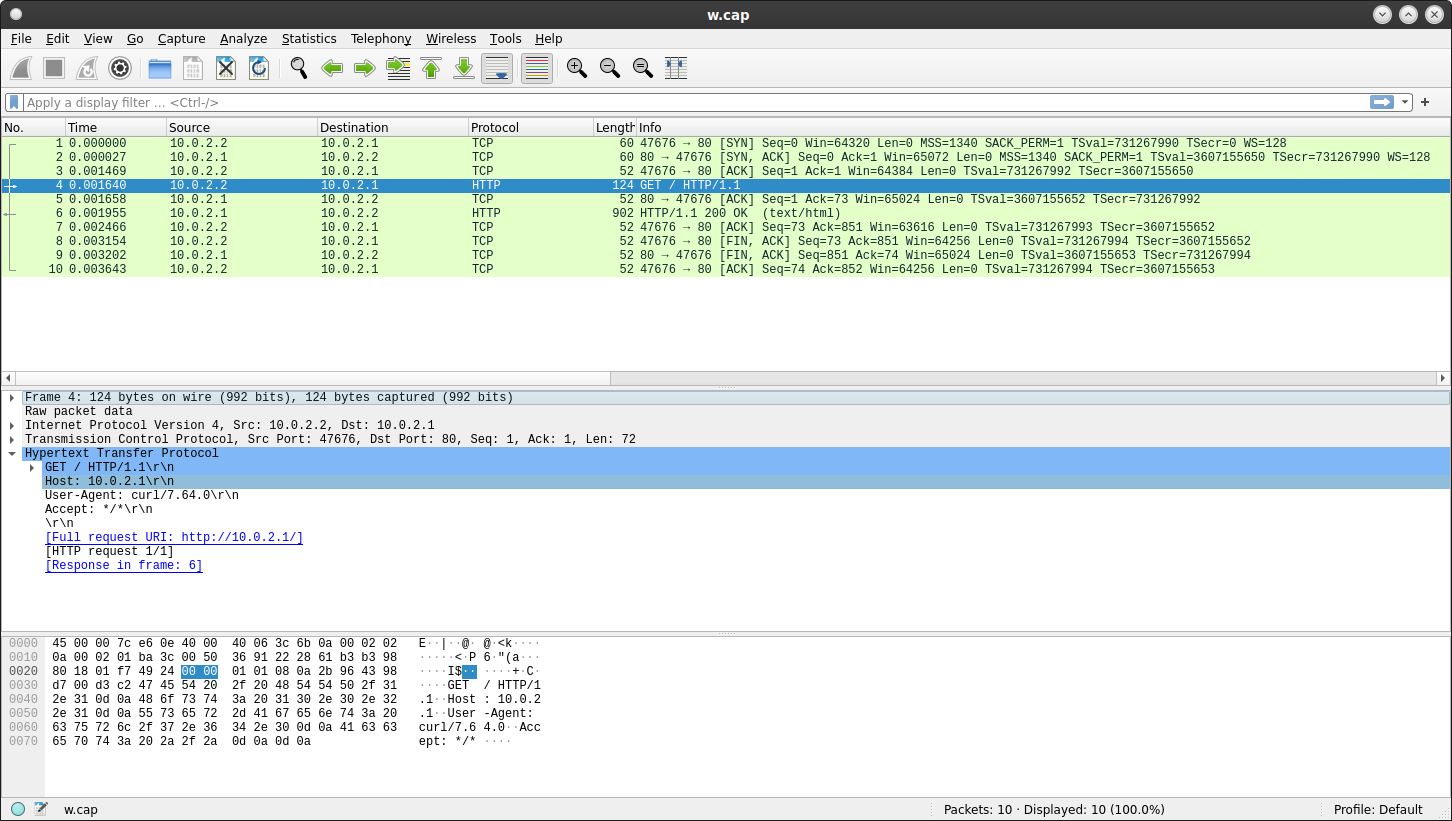
as seen by the wireguard interface iwg0
As expected, this appears as a normal interface so you expect to see just HTTP request we sent earlier.
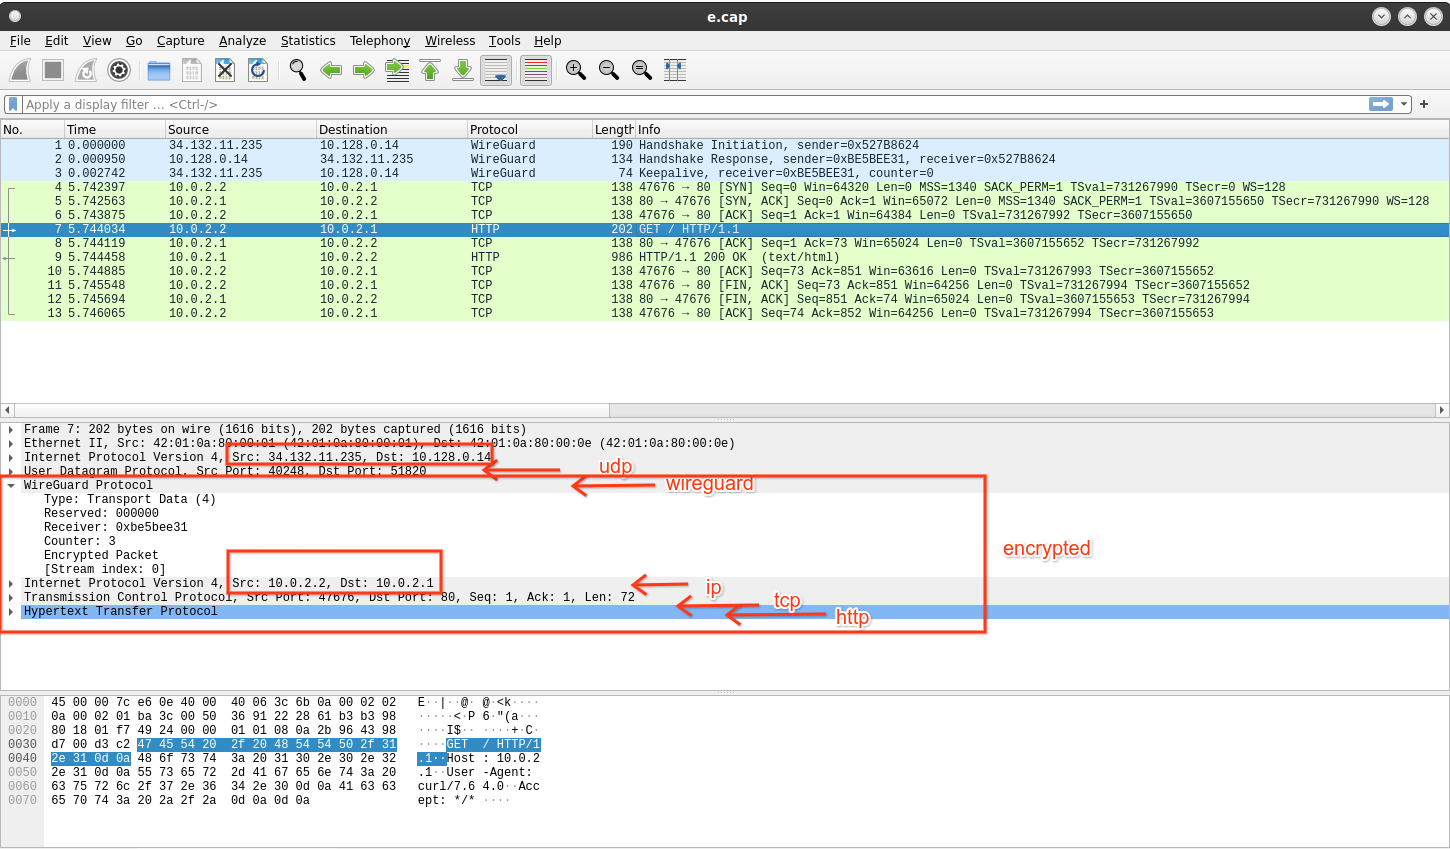
Display Wired Interface traffic
Display the traffic from the wired interface
as seen by the wired (eth0) interface
Everything is encrypted…which is what we expect
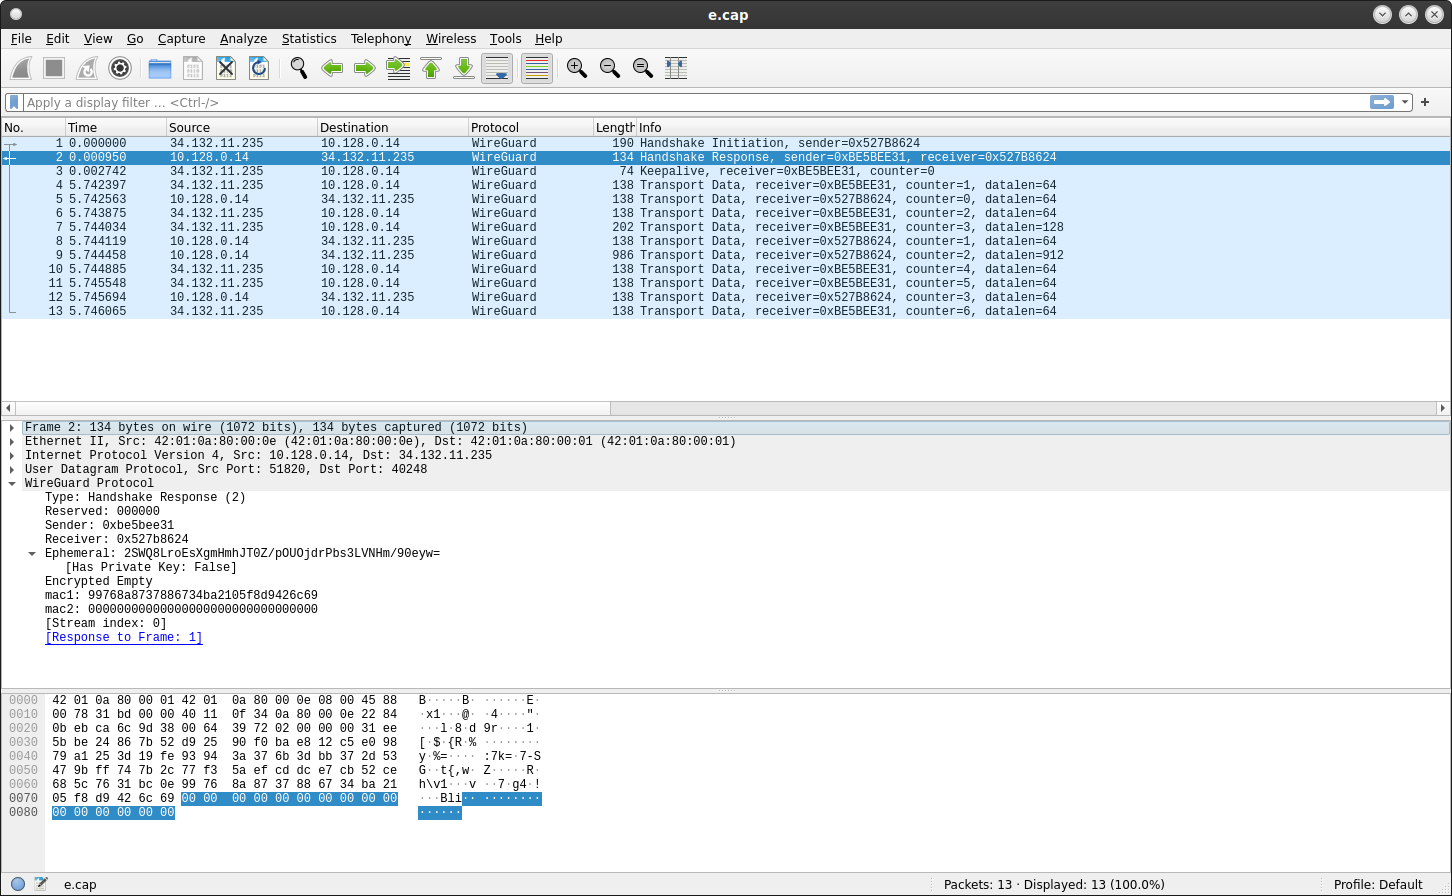
Display Wired Interface traffic with keylog
Create a keylog.log file with the output of the extractor
$ cat keylog.log
New handshake session:
  PRESHARED_KEY = AAAAAAAAAAAAAAAAAAAAAAAAAAAAAAAAAAAAAAAAAAA=
  LOCAL_STATIC_PRIVATE_KEY = EPRc4jRSKgMA9SSs40tdV2TeOr/KomW9LmBDJ4jLlEk=
  REMOTE_STATIC_PUBLIC_KEY = WsLevjVjf6+SxH2Y4AkzRvNTkcb0lPZWufRkNVckWGc=
  LOCAL_EPHEMERAL_PRIVATE_KEY = yCIxv4JHNumm86PwhleTFusKpWro64MpJfmLt0CdgEM=
Now start Wireshark again with the keylog.log specified
wireshark e.cap --log-level=debug -owg.keylog_file:keylog.log
Traffic is still not decrypted though we can see some more data in the Handshake Request-Response..
TBH, i expected everything to be decrypted here…i man everything is in the file we specified and provided to wireshark (even the server’s private KEY and session key)
as seen by the wired (eth0) interface with the wireguard keylog dissector
(i think this is a bug somewhere)
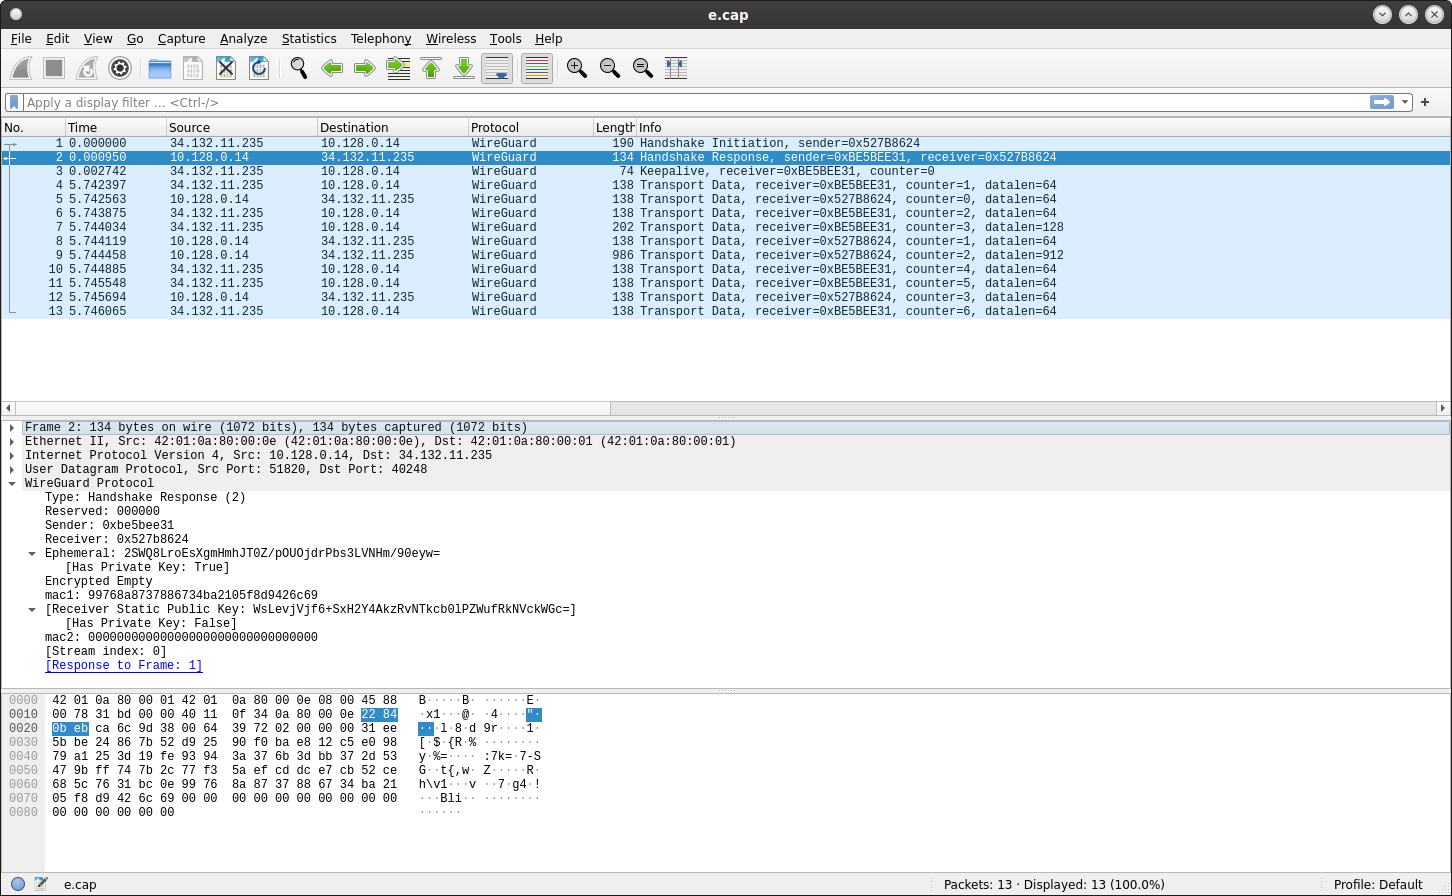
Specify PrivateKey
Anyway, i got around this by specifying the private key in wireskark too.
Specify the PrivateKey for the server in the configuration for wireshark (in our case its EPRc4jRSKgP1JKzjS11XAGTeOr/KomW9LmBDJ4jLlEk=):
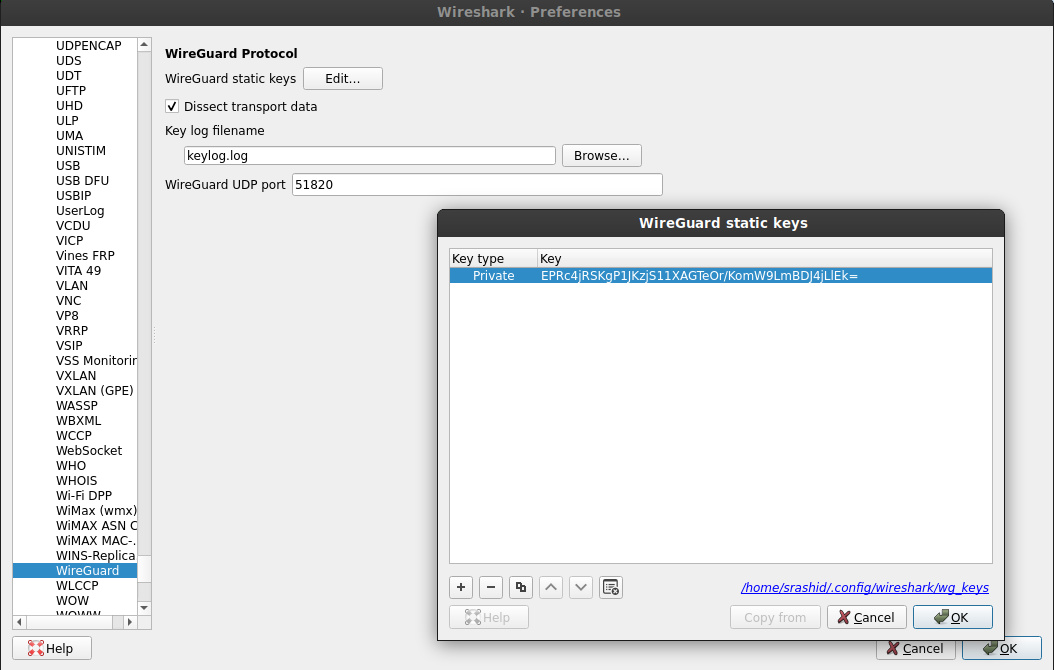
add the server private key
(again, this is the same key visible in keylog.log1 as LOCAL_STATIC_PRIVATE_KEY)..
however….this time you’ll see the full stack displayed!
wireshark-wireguard stack decrypted!
Thats kinda it…this is mostly just an academic exercise i ran over a Sunday morning just to help me understand and log what i learned
…Practically, just use the wireguard interface as a normal interface to see decoded traffic..
Appendix
This site supports webmentions. Send me a mention via this form.