Hashicorp Vault Identity Provider with Google Workload Identity Federation
2022-04-11Hashicorp Vault’s Identity Secrets Engine acts as an OIDC provider and can provide any Vault user an OpenID token (id_token).
GCP Workload Identity Federation allows you to configure and exchange an external identity sources for one that can be used to access GCP services.
In other words, you should be able to exchange a Vault identity source directly with GCP and access GCP without resorting to using Vault GCP Secrets Engine.
Well, sure, but the implementation details for this makes it impractical and this tutorial pretty academic:
The reason being is that for GCP Workload Federation to use an external source as an OIDC provider, GCP needs a way to access the identity providers oidc .well-known/openid-configuration endpoint.
In otherwords, https://your_vault_server/v1/identity/oidc/.well-known/openid-configuration needs to be publicly accessible by GCP.
Thats a non starter almost for everyone but this is my blog and i can write about what i choose.
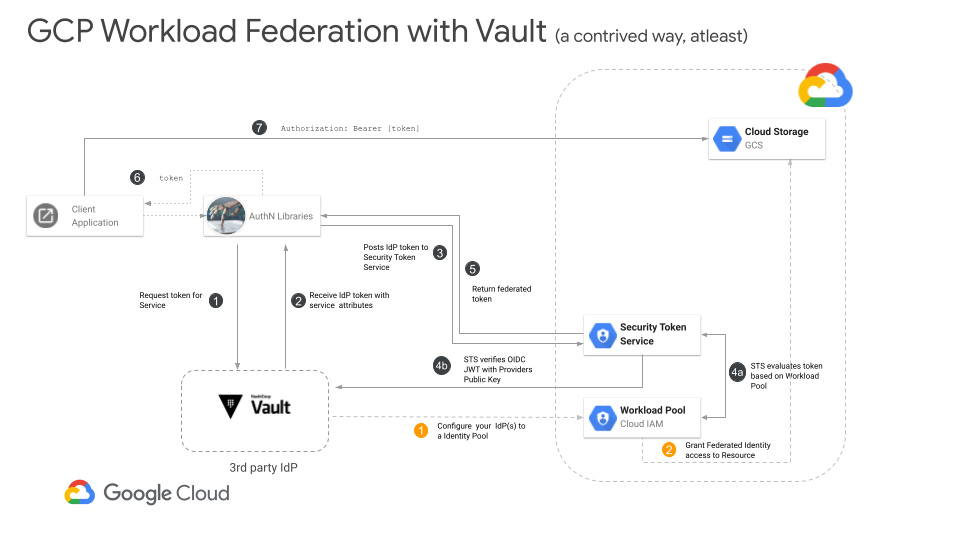
dont ask about step 4b
So i’m going to make this tutorial even more unrealistic: we’re going to run vault on your laptop and expose its openID discovery endpoint using ngrok. I’m only doing this for simplicity…if you actually have vault or the well-known endpoint exposed publicly somehow, you dont’ need to do this silly stuff with ngrok.
For more information, see
- Understanding workload identity federation
- Using Kubernetes Service Accounts for Google Workload Identity Federation
- Federating Firebase to Google Cloud APIs
Setup
This is what you’ll need for this tutorial:
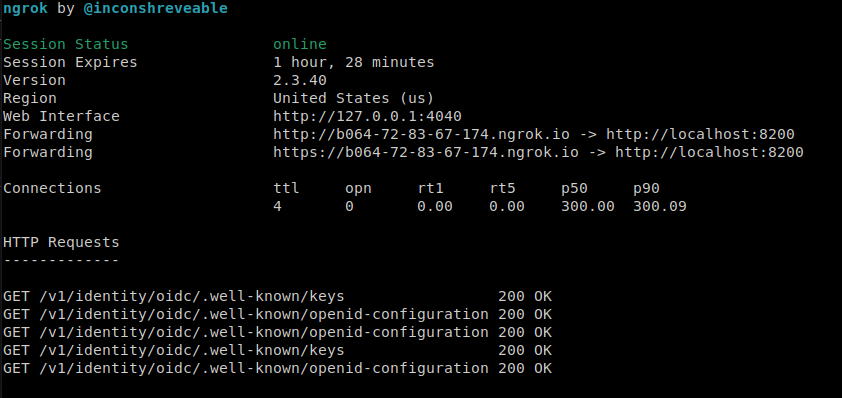
First start ngrok and get the allocated endpoint.
This endpoint is dynamic and you have 1hour to do this tutorial. (pressure..no worries, i did the steps here)
./ngrok http   localhost:8200

# note down the https discovery endpoint and export it
export DISCOVERY_URL="https://random_id.ngrok.io"
Start Vault in dev mode
vault server --dev -dev-root-token-id root
## please be aware your vault server is now *visible* to the internet as $DISCOVERY_URL

# in a new window, attach to the root token and configure

export VAULT_ADDR='http://localhost:8200'
export VAULT_TOKEN=root

## Configure the OIDC issuer
vault write identity/oidc/config  issuer=$DISCOVERY_URL
vault read identity/oidc/config

## check if the Discovery Endpoint works externally
curl -s $DISCOVERY_URL/v1/identity/oidc/.well-known/openid-configuration | jq '.'

curl -s $DISCOVERY_URL/v1/identity/oidc/.well-known/keys | jq '.'

# enable the username password authentication for vault
# you can use any auth but for this tutorial, w'ere just going to use something basic

vault auth enable userpass


# create a policy to read a token in a role
vault policy write config-policy  - <<EOF

path "identity/oidc/token/role-001" {
  capabilities = [ "create", "read" ]
}

path "/auth/token/create" {
  capabilities = ["create"]
}


path "auth/token/renew" {
  capabilities = ["update", "create"]
}


path "auth/token/lookup-self" {
  capabilities = ["read"]
}

path "auth/token/renew" {
  capabilities = ["update", "create"]
}

path "auth/token/lookup-accessor" {
  capabilities = [ "read", "update" ]
}
EOF


## create a user with a given password and allow alice to get
## a token for the "config-policy" we just defined

vault write auth/userpass/users/alice \
    password="password" \
    token_ttl="1h" \
    policies=config-policy

## create an identity entity (this is a vault artifact that allows identity token mappings)

vault write identity/entity \
    name="alice" \
    metadata="email=alice@domain.com" \
    metadata="phone_number=123-456-7890" \
    disabled=false

export ENTITY_ID=$(vault read -field=id identity/entity/name/alice)

## also create an "engineering" group
vault write identity/group \
    name="engineering" \
    member_entity_ids="$ENTITY_ID"

export GROUP_ID=$(vault read -field=id identity/group/name/engineering)

export USERPASS_ACCESSOR=$(vault auth list -detailed -format json | jq -r '.["userpass/"].accessor')

echo $ENTITY_ID
echo $GROUP_ID
echo $USERPASS_ACCESSOR


# now alias the identity (i.,e associate alice with the stuff we just defined)
vault write identity/entity-alias \
    name="alice" \
    canonical_id="$ENTITY_ID" \
    mount_accessor="$USERPASS_ACCESSOR"


# create a key
vault write identity/oidc/key/my-key \
    allowed_client_ids="*" \
    verification_ttl="2h" \
    rotation_period="1h" \
    algorithm="RS256"


# define the role alice can use and the template for that role's id_tokens
## the id_tokens will contain the claims below

export USER_TEMPLATE=$(cat << EOF
{
    "username": {{identity.entity.name}},
    "contact": {
        "email": {{identity.entity.metadata.email}},
        "phone_number": {{identity.entity.metadata.phone_number}}
    },
    "groups": {{identity.entity.groups.names}}
}
EOF
)


vault write identity/oidc/role/role-001 \
    description="The testrole" \
    key=my-key \
    ttl=1h \
    template="$(echo ${USER_TEMPLATE} | base64 -)"


vault read identity/oidc/role/role-001

export CLIENT_ID=`vault read -field client_id identity/oidc/role/role-001`
The role output will contain something like this:
vault read identity/oidc/role/role-001

Key          Value
---          -----
client_id    PvnKrIhX5lAZ2gBhjnZhhbf3ez
key          my-key
template     { "username": {{identity.entity.name}}, "contact": { "email": {{identity.entity.metadata.email}}, "phone_number": {{identity.entity.metadata.phone_number}} }, "groups": {{identity.entity.groups.names}} }
ttl          1h
the id_token that vault will issue will have the audience aud: value set to PvnKrIhX5lAZ2gBhjnZhhbf3ez (yours will be different)
User login to vault
Now in a new window, login to vault as alice
export VAULT_ADDR='http://localhost:8200'
vault login -method=userpass \
    username=alice \
    password=password

# read back the id_token
vault read identity/oidc/token/role-001
The output will return the user’s id_token
Key          Value
---          -----
client_id    PvnKrIhX5lAZ2gBhjnZhhbf3ez
token        eyJhbGciOiJSUzI1NiIsImtpZCI6ImYxMWM1MDJmLWFmYzUtZTc0ZS0wYzAyLWNhNzdmNzA2MTFjMSJ9.eyJhdWQiOiJQdm5LckloWDVsQVoyZ0Joam5aaGhiZjNleiIsImNvbnRhY3QiOnsiZW1haWwiOiJhbGljZUBkb21haW4uY29tIiwicGhvbmVfbnVtYmVyIjoiMTIzLTQ1Ni03ODkwIn0sImV4cCI6MTY0OTcwMzU3NywiZ3JvdXBzIjpbImVuZ2luZWVyaW5nIl0sImlhdCI6MTY0OTY5OTk3NywiaXNzIjoiaHR0cHM6Ly9iMDY0LTcyLTgzLTY3LTE3NC5uZ3Jvay5pby92MS9pZGVudGl0eS9vaWRjIiwibmFtZXNwYWNlIjoicm9vdCIsInN1YiI6IjBjYThlZTFmLTUyNTYtYTQ5OC1jMTdlLTNmOGM2YTI0YTBmNCIsInVzZXJuYW1lIjoiYWxpY2UifQ.HvgHnYaHfsCU7O9nnRxz3V_gUS2MZi2bO_od8dgkZ1r_7Uarx7iiVRLMUyPb-DIFfZxISGHWajDA3uWLXSycsQvy5-amYszxTzZeKNF8h-YOpIidybnTYIgHyYgNQ33NBFvivpXSy90Q1SqHZxW6NhrHk4jKyQJBb-v8CM8j2rTAsimy1PLK5bnNlKJRposYGRXI-K7EIPxvRVP2uwThSs4HOD5MQGHYi3SWlpd7IDhZ54q3uj60ZrF6nWtZvH8WS-l-fjflC1l9PYfnNuJKWX8OIb85HJs476YOG5gt_Zye_CFZOjfNBc-F_xZlIPVElzgWMxCd-KpQIgFgfJdBvw
ttl          1h
The oidc token is in this format. Note the aud is the client_id and the sub uniquely represents alice : 0ca8ee1f-5256-a498-c17e-3f8c6a24a0f4.
$ vault token lookup
Key                 Value
---                 -----
accessor            G7i0sBdvM9fAaPTscg6XJIxk
creation_time       1649699950
creation_ttl        1h
display_name        userpass-alice
entity_id           0ca8ee1f-5256-a498-c17e-3f8c6a24a0f4  <<<<<<<<<
expire_time         2022-04-11T14:59:10.264446178-04:00
explicit_max_ttl    0s
id                  s.rqgInsjuooeCo5j0lSohl3uG
issue_time          2022-04-11T13:59:10.264450729-04:00
meta                map[username:alice]
num_uses            0
orphan              true
path                auth/userpass/login/alice
policies            [config-policy default]
renewable           true
ttl                 55m22s
type                service
We’re going to directly bind alice’s sub filed here (its very specific binding)
{
  "alg": "RS256",
  "kid": "f11c502f-afc5-e74e-0c02-ca77f70611c1"
}
{
  "aud": "PvnKrIhX5lAZ2gBhjnZhhbf3ez",
  "contact": {
    "email": "alice@domain.com",
    "phone_number": "123-456-7890"
  },
  "exp": 1649703577,
  "groups": [
    "engineering"
  ],
  "iat": 1649699977,
  "iss": "https://b064-72-83-67-174.ngrok.io/v1/identity/oidc",
  "namespace": "root",
  "sub": "0ca8ee1f-5256-a498-c17e-3f8c6a24a0f4",
  "username": "alice"
}
Configure Workload Identity
Now w’ere going to configure workload identity.
Back on the window where you are logged in as admin (not alice), configure a federation config just for alice
export ALICE="0ca8ee1f-5256-a498-c17e-3f8c6a24a0f4"
export CLIENT_ID=`vault read -field client_id identity/oidc/role/role-001`
export PROJECT_ID=`gcloud config get-value core/project`
export PROJECT_NUMBER=`gcloud projects describe $PROJECT_ID --format='value(projectNumber)'`
gcloud beta iam workload-identity-pools create pool-vault \
--location="global" \
--description="Vault OIDC Pool" \
--display-name="Vault OIDC Pool" --project $PROJECT_ID
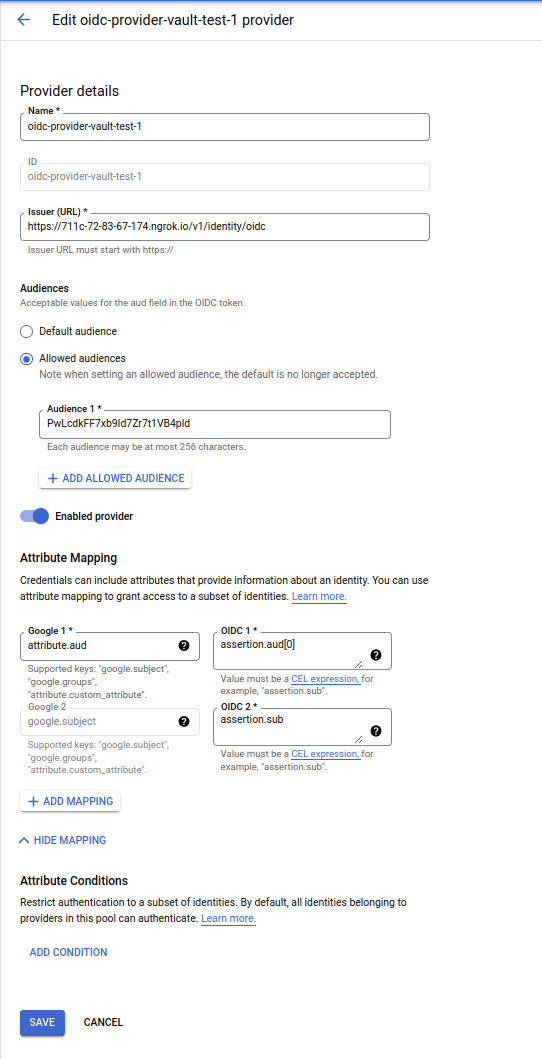
gcloud beta iam workload-identity-pools providers create-oidc oidc-provider-vault-1 \
--workload-identity-pool=pool-vault \
--issuer-uri="$DISCOVERY_URL/v1/identity/oidc" \
--location="global" \
--attribute-mapping="google.subject=assertion.sub,attribute.aud=assertion.aud[0]" \
--allowed-audiences="$CLIENT_ID" \
--project $PROJECT_ID
Federation
Now allow the the federated token for alice access to a GCS bucket
# create a test bucket with uniform bucket policy
##  i can't get the single command with the -b on working so omit that and use the cloud console..
gsutil mb -b on gs://$PROJECT_ID-vault-federated
echo -n "foobar" > /tmp/foo.txt
gsutil cp /tmp/foo.txt gs://$PROJECT_ID-vault-federated

gsutil iam ch \
    principal://iam.googleapis.com/projects/$PROJECT_NUMBER/locations/global/workloadIdentityPools/pool-vault/subject/$ALICE:objectViewer \
    gs://$PROJECT_ID-vault-federated
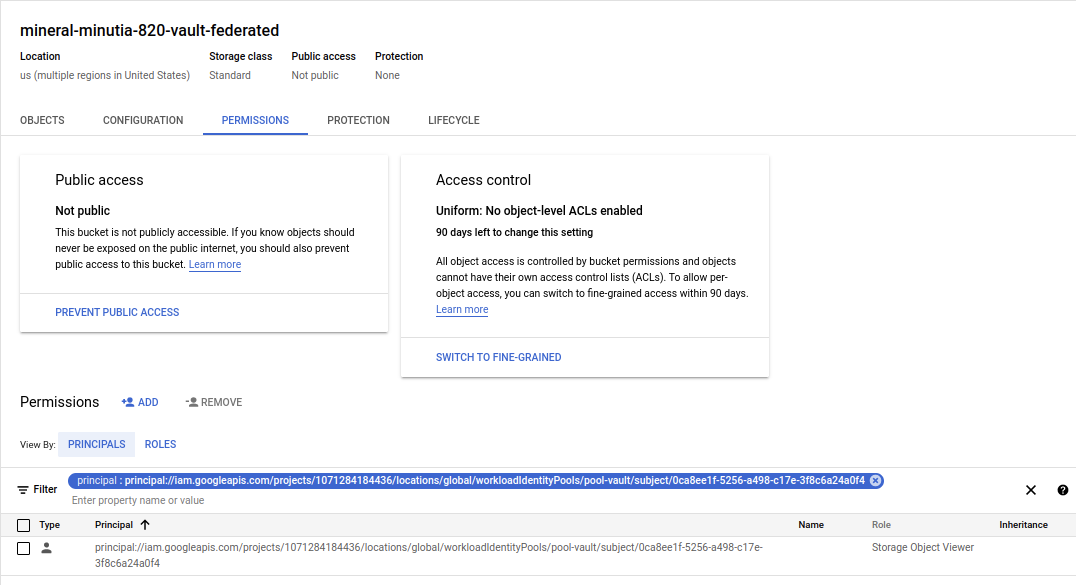
federated binding to GCS
Please note that we are using the federated token without impersonation
Login as Alice to access federated token
export OIDC_TOKEN=`vault read -field token identity/oidc/token/role-001`

# get the token manually
export FEDERATED_TOKEN=`curl -s -X POST    -d "grant_type=urn:ietf:params:oauth:grant-type:token-exchange"  \
   -d "audience=//iam.googleapis.com/projects/$PROJECT_NUMBER/locations/global/workloadIdentityPools/pool-vault/providers/oidc-provider-vault-1" \
   -d "subject_token_type=urn:ietf:params:oauth:token-type:jwt" \
   -d "requested_token_type=urn:ietf:params:oauth:token-type:access_token" \
   -d "scope=https://www.googleapis.com/auth/cloud-platform" \
   -d "subject_token=$OIDC_TOKEN"     https://sts.googleapis.com/v1beta/token | jq  -r '.access_token'`
echo $FEDERATED_TOKEN
Now w’ere finally going to access the gcs object
curl    -H "Authorization: Bearer $FEDERATED_TOKEN"  https://storage.googleapis.com/storage/v1/b/$PROJECT_ID-vault-federated/o/foo.txt?alt=media
foobar
done…we’ve just used vault’s own provider to access a storage bucket without vault directly issuing a GCP access_token
and…as for ngrok, i had enough time to spare
clock was ticking
This site supports webmentions. Send me a mention via this form.