Vault auth and secrets on GCP
2019-09-24Sample workflow covering basic use of Vault on GCP.
The specific aspects covered here:
- Using GCP credentials to authenticate TO Vault (
vault login -method=gcp) Google Cloud Auth Method - Using Vault to GET GCP secrets (
vault read gcp/token/...) Google Cloud Secrets Engine - Using Vault to Encrypt/Decrypt a secret through Google Cloud KMS
In other words, for (1) use a Google Credential (OIDC Token) to authenticate TO Vault to get a Vault-native token VAULT_TOKEN
For (2) you use a Vault-native token (VAULT_TOKEN) to get a temporary Google access_token or the raw serviceAccount JSON key material for Google Cloud.
This article shows a basic setup for both scenarios in addition to basic Vault key-value and encryption endpoints (/transit). I started looking into Vault recently as part of my work and found the two different capabilities a bit opaque so i started setting up and testing each of the features. This article is nothing but an end-to-end of some of the Vault-GCP integration I came across.
It doe not cover running Vault in GKE or using kubernetes ServiceAccounts for Vault auth. FOr that see Vault Agent with Kubernetes
You can find the source here
Setup
First we setup some environment variables we will resuse several times as well as the service account Vault will run as to provision services on GCP.
export PROJECT_ID=`gcloud config get-value core/project`
export PROJECT_NUMBER=`gcloud projects describe $PROJECT_ID --format="value(projectNumber)"`
export VAULT_SERVICE_ACCOUNT=vault-svc-account@$PROJECT_ID.iam.gserviceaccount.com

gcloud iam service-accounts create vault-svc-account --display-name "Vault Service Account"


gcloud iam service-accounts keys create vault-svc.json --iam-account=$VAULT_SERVICE_ACCOUNT
gcloud projects add-iam-policy-binding $PROJECT_ID --member=serviceAccount:$VAULT_SERVICE_ACCOUNT --role=roles/iam.serviceAccountAdmin
gcloud projects add-iam-policy-binding $PROJECT_ID --member=serviceAccount:$VAULT_SERVICE_ACCOUNT --role=roles/iam.serviceAccountKeyAdmin
gcloud projects add-iam-policy-binding $PROJECT_ID --member=serviceAccount:$VAULT_SERVICE_ACCOUNT --role=roles/compute.viewer
gcloud projects add-iam-policy-binding $PROJECT_ID --member=serviceAccount:$VAULT_SERVICE_ACCOUNT --role=roles/storage.admin
Start Vault
Start vault and bootstrap the GCP credentials it will use later during GCP secrets.
export GOOGLE_APPLICATION_CREDENTIALS=`pwd`/vault-svc.json

$ vault server --dev

             Api Address: http://127.0.0.1:8200
                     Cgo: disabled
         Cluster Address: https://127.0.0.1:8201
              Listener 1: tcp (addr: "127.0.0.1:8200", cluster address: "127.0.0.1:8201", max_request_duration: "1m30s", max_request_size: "33554432", tls: "disabled")
               Log Level: info
                   Mlock: supported: true, enabled: false
                 Storage: inmem
                 Version: Vault v1.3.0-dev
             Version Sha: d61d5b1166e049a3108bab1e7f8cc180e6e2a375+CHANGES

Unseal Key: MQVDpxAJPYefdydRBNpltjePZNtWZn+/Hdt3bScddDY=
Root Token: s.X7FsnjN5CQGwrp2tlMT4g2om
Note down the Root Token. We will use that below for use in an “Admin” session
Authorize Root Admin session
In a new window, export the Root Token
export VAULT_ADDR='http://localhost:8200'
export VAULT_TOKEN=s.X7FsnjN5CQGwrp2tlMT4g2om
$ vault status
Key             Value
---             -----
Seal Type       shamir
Initialized     true
Sealed          false
Total Shares    1
Threshold       1
Version         1.3.0-dev
Cluster Name    vault-cluster-77df4a3f
Cluster ID      733099f6-8464-0aae-3c59-038c34825bce
HA Enabled      false
Create policies to test basic vault operations. (note, these policies are permissive, its recommended to tune/restrict them)
vault policy write token-policy  token_policy.hcl

vault secrets enable -version=2  -path=kv kv
vault secrets enable transit
vault policy write secrets-policy  secrets_policy.hcl
vault write -f transit/keys/foo
Create a new Policy restricted token
Now we’ll create a new restricted token (note, this step is basic vault stuff unrelated directly to GCP functions.
vault token create -policy=token-policy -policy=secrets-policy
You will see a new token and token_accessor. Note them down; we will use these as the ’end user’ tokens
$ vault token create -policy=token-policy  -policy=secrets-policy
Key                  Value
---                  -----
token                s.H2Ad0J78eSFT2OrcGRo5H8ai
token_accessor       sTUFeU5XFB0uekw6vAS4BjwY
token_duration       768h
token_renewable      true
token_policies       ["default" "secrets-policy" "token-policy"]
identity_policies    []
policies             ["default" "secrets-policy" "token-policy"]
This new token s.H2Ad0J78eSFT2OrcGRo5H8ai uses the policies you just defined in the .hcl files. Those policies allows you to do basic
token, encryption and key/value operations
Open up another new window and export the token as an env-var
export VAULT_ADDR='http://localhost:8200'
export VAULT_TOKEN=s.H2Ad0J78eSFT2OrcGRo5H8ai
Now use the token to query information about itself (as provided by the token_policy):
$ vault token  lookup

accessor            sTUFeU5XFB0uekw6vAS4BjwY
creation_time       1569024289
creation_ttl        768h
display_name        token
entity_id           n/a
expire_time         2019-10-22T20:04:49.143956789-04:00
explicit_max_ttl    0s
id                  s.H2Ad0J78eSFT2OrcGRo5H8ai
issue_time          2019-09-20T20:04:49.143956519-04:00
meta                <nil>
num_uses            0
orphan              false
path                auth/token/create
policies            [default secrets-policy token-policy]
renewable           true
ttl                 767h58m33s
type                service
And via its accessor:
vault token lookup --accessor sTUFeU5XFB0uekw6vAS4BjwY

Key                 Value
---                 -----
accessor            sTUFeU5XFB0uekw6vAS4BjwY
creation_time       1569024289
creation_ttl        768h
display_name        token
entity_id           n/a
expire_time         2019-10-22T20:04:49.143956789-04:00
explicit_max_ttl    0s
id                  n/a
issue_time          2019-09-20T20:04:49.143956519-04:00
meta                <nil>
num_uses            0
orphan              false
path                auth/token/create
policies            [default secrets-policy token-policy]
renewable           true
ttl                 767h58m12s
type                service
Ok, all we’ve done here is shown that we can lookup info for the token as defined in the .hcl file
Vault Secret
Now use the new restricted token to put and then get a key-value into vault
$ vault kv put kv/message foo=world
Key              Value
---              -----
created_time     2019-09-21T00:07:20.40618114Z
deletion_time    n/a
destroyed        false
version          1

$ vault kv get kv/message
====== Metadata ======
Key              Value
---              -----
created_time     2019-09-21T00:07:20.40618114Z
deletion_time    n/a
destroyed        false
version          1

=== Data ===
Key    Value
---    -----
foo    world
So this shows basic key-value storage for Vault
Vault Encryption/Decryption (Transit Engine)
Now we’ll test out the transit endpoint to encrypt/decrypt some data.
Encrypt:
echo -n "the quick brown fox" | base64 | vault write transit/encrypt/foo plaintext=-
Key           Value
---           -----
ciphertext    vault:v1:vvL11NeV7d4XbS3mg9ef8R83R2jmo0qFK+W3S+PWBfj7Pd5MHf5IJzuJJGbiV5w=
Decrypt:
vault write transit/decrypt/foo ciphertext=vault:v1:vvL11NeV7d4XbS3mg9ef8R83R2jmo0qFK+W3S+PWBfj7Pd5MHf5IJzuJJGbiV5w=

echo "dGhlIHF1aWNrIGJyb3duIGZveA===" | base64 -d
GCP Vault Auth
Ok, now we’re going to finally test GCP Vault Auth. Again, this is authenticating TO vault using a ServiceAccount JWT
We will exchange a self-signed JWT Token issued by generic service account for and get a Vault-native token.
That is, you will start off with a Google Service Account JSON file, then use that to create a self-signed JWT.
The JWT that you will create will have an audience field for the role you define. In the example below, the aud: field is http://vault/my-iam-role.
Once you mint the JWT, send that JWT to Vault for authentication. Vault will respond back with its own VAULT_AUTH token you can use as usual with Vault.
In the Admin window, run the following to create a service account and associate it with vault to map them together.
Initialize GCP credentails for Vault
export VAULT_ADDR='http://localhost:8200'
vault auth enable gcp
Now create a new service account. This is the service account a user will have and use to authenticate against vault.
export PROJECT_ID=`gcloud config get-value core/project`
export GENERIC_SERVICE_ACCOUNT=generic-svc-account@$PROJECT_ID.iam.gserviceaccount.com
export VAULT_SERVICE_ACCOUNT=vault-svc-account@$PROJECT_ID.iam.gserviceaccount.com

gcloud iam service-accounts create generic-svc-account --display-name "Generic Service Account"
gcloud iam service-accounts keys create generic-svc.json --iam-account=$GENERIC_SERVICE_ACCOUNT
Now assign a vault role maps the service account into a role.
vault write auth/gcp/role/my-iam-role \
    type="iam" \
    policies="token-policy,secrets-policy" max_jwt_exp=60m \
    bound_service_accounts="$GENERIC_SERVICE_ACCOUNT"
Then in a new window, get the ID token for the given service account. Notice the audience is specifically for the role we just created role/my-jwt-role
vault login -method=gcp \
    role="my-iam-role" \
    service_account="$GENERIC_SERVICE_ACCOUNT" \
    project="$PROJECT_ID" \
    jwt_exp="15m" \
    credentials=@generic-svc.json
you’ll see:
Error authenticating: unable to sign JWT for projects/clamav-241815/serviceAccounts/generic-svc-account@clamav-241815.iam.gserviceaccount.com using given Vault credentials: googleapi: Error 403: Permission iam.serviceAccounts.signJwt is required to perform this operation on service account projects/clamav-241815/serviceAccounts/generic-svc-account@clamav-241815.iam.gserviceaccount.com., forbidden
whooops…why is that? Well Vault uses an IAM API itself to sign a JWT (i.,e iamcredentials.signJWT). So lets do that:
$ gcloud iam service-accounts add-iam-policy-binding $GENERIC_SERVICE_ACCOUNT --member=serviceAccount:$GENERIC_SERVICE_ACCOUNT --role=p=roles/iam.serviceAccountTokenCreator
The iam.serviceAccountTokenCreator role includes concentric set of permission (see Concentric IAMCredentials Permissions: The secret life of signBlob. If you just need to generate an access_token or an id_token, consider generating a custom role with that specific capability.
then run the vault login command from above and you’ll see
Key                                 Value
---                                 -----
token                               s.Au2B1azdJnWTHCfc1gBDEwDK
token_accessor                      t1lkQDiaHh21Cjb9e2a1SXfF
token_duration                      768h
token_renewable                     true
token_policies                      ["default" "secrets-policy" "token-policy"]
identity_policies                   []
policies                            ["default" "secrets-policy" "token-policy"]
token_meta_service_account_email    generic-svc-account@clamav-241815.iam.gserviceaccount.com
token_meta_service_account_id       106138769222785354498
token_meta_project_id               clamav-241815
token_meta_role                     my-iam-role
..but wait, its just signing a JWT using a private thats you already have right there!! (@generic-svc.json)?!
Can’t we just use the service account we already to sign? Ofcourse..
Run the go snippet provided here and get the self-signed JWT token
go run main.go --serviceAccountFile=`pwd`/generic-svc.json --expIn 3600 --audience "http://vault/my-iam-role" --expIn=3600 --logtostderr=1 -v 5
If you decode the JWT, it will look like:
{
  "alg": "RS256",
  "kid": "fb9686314a329255860d4da250b2f559ce7a10c0",
  "typ": "JWT"
}.
{
  "aud": "http://vault/my-iam-role",
  "exp": 1569031729,
  "sub": "generic-svc-account@clamav-241815.iam.gserviceaccount.com"
}
Now export the token in an env var
export VAULT_ADDR='http://localhost:8200'
export TOKEN=<the_token>
and use that JWT token to authenticate TO vault
vault write -field=token auth/gcp/login role="my-iam-role" jwt="$TOKEN"
You should see a Vault Auth token in response
s.ApYGAVhc08fwgNfQkcvTPnVK
Either way, you can another window, export this token and use it as ususal as in the examples for kv and transit encryption above (that will work since we authorized it with the same acl)
$ export VAULT_ADDR='http://localhost:8200'
$ export VAULT_TOKEN=s.ApYGAVhc08fwgNfQkcvTPnVK

$ vault token  lookup

Key                 Value
---                 -----
accessor            D1vyqfzqWKgPgaUSoscPHuHW
creation_time       1569028459
creation_ttl        768h
display_name        gcp-generic-svc-account@clamav-241815.iam.gserviceaccount.com
entity_id           c4930d2b-c87a-0892-5c23-7f78e4fc6764
expire_time         2019-10-22T21:14:19.373153107-04:00
explicit_max_ttl    0s
id                  s.ApYGAVhc08fwgNfQkcvTPnVK
issue_time          2019-09-20T21:14:19.373152536-04:00
meta                map[project_id:clamav-241815 role:my-iam-role service_account_email:generic-svc-account@clamav-241815.iam.gserviceaccount.com service_account_id:106138769222785354498]
num_uses            0
orphan              true
path                auth/gcp/login
policies            [default secrets-policy token-policy]
renewable           true
ttl                 767h58m12s
type                service
Vault auth for GCE instances
Vault can also authenticate compute engine instances using the GCE instances instance identity document. The identity document is simplay a Google signed OIDC token which can be verified against a public certificate google provides.
Frankly, this is what vault should be using to authenticate even service account. The previous section authenticates a service account using a “self-signed” JWT…but what really asserts identity is a google OIDC token. For more information, see google_id_token
Anyway, in the Admin window, run the following to create the endpoint:
$ gcloud compute instances create iam-1 --zone us-central1-a

$ export GCE_SVC_ACCOUNT=`gcloud compute instances describe iam-1 --format="value(serviceAccounts[].email)"`
$ vault auth enable gcp
$ vault write auth/gcp/role/my-gce-role \
    type="gce" \
    policies="token-policy,secrets-policy" \
    bound_projects="$PROJECT_ID" \
    bound_service_accounts="$GCE_SVC_ACCOUNT"
Then create a GCE instance and within that get an oidc token with &format=FULL and the audience that specifies our vault role (remember to copy the TOKEN part but remove Connection to ... trailer)
$ gcloud compute ssh iam-1 -- -t "curl -s -H 'Metadata-Flavor: Google' http://metadata.google.internal/computeMetadata/v1/instance/service-accounts/default/identity?audience=http://vault/my-gce-role\&format=full; echo ''"
The following shows a sample OIDC token that gets returned by the metadata server.
{
  "alg": "RS256",
  "kid": "0b0bf186743471a1edcac3060d1256f9e4050ba8",
  "typ": "JWT"
}.
{
  "aud": "http://vault/my-gce-role",
  "azp": "100368210816668891989",
  "email": "837509470220-compute@developer.gserviceaccount.com",
  "email_verified": true,
  "exp": 1569087045,
  "google": {
    "compute_engine": {
      "instance_creation_timestamp": 1569080987,
      "instance_id": "2407269007706814584",
      "instance_name": "iam-1",
      "project_id": "clamav-241815",
      "project_number": 837509470220,
      "zone": "us-central1-a"
    }
  },
  "iat": 1569083445,
  "iss": "https://accounts.google.com",
  "sub": "100368210816668891989"
}
export VAULT_ADDR='http://localhost:8200'
export TOKEN=<id_token>
Now try to get a vault token and use as normal
$ vault write -field=token auth/gcp/login     role="my-gce-role"      jwt="$TOKEN"
  s.5F7A8eDEPXx7OWIrvaFkViOp
$ export VAULT_TOKEN=s.5F7A8eDEPXx7OWIrvaFkViOp

$ vault token lookup

Key                 Value
---                 -----
accessor            1u0xYXdEnraiRqvMSaBn3rN6
creation_time       1569088587
creation_ttl        768h
display_name        gcp-iam-1
entity_id           3f8df349-8985-6fd8-3e47-a29c461c965d
expire_time         2019-10-23T13:56:27.51469795-04:00
explicit_max_ttl    0s
id                  s.5F7A8eDEPXx7OWIrvaFkViOp
issue_time          2019-09-21T13:56:27.514697471-04:00
meta                map[instance_creation_timestamp:1569080987 instance_id:2407269007706814584 instance_name:iam-1 project_id:clamav-241815 project_number:837509470220 role:my-gce-role service_account_email:837509470220-compute@developer.gserviceaccount.com service_account_id:100368210816668891989 zone:us-central1-a]
num_uses            0
orphan              true
path                auth/gcp/login
policies            [default secrets-policy token-policy]
renewable           true
ttl                 767h59m11s
type                service
Vault auth using Google OIDC 3LO
In the Admin window, run the following to create a client_id and client_secret as documented here. Remember to set the “Authorized redirect URIs” to include http://localhost:8400/oidc/callback
Once you have those, enable the auth mechanism and continue to setup vault to allow OIDC from google:
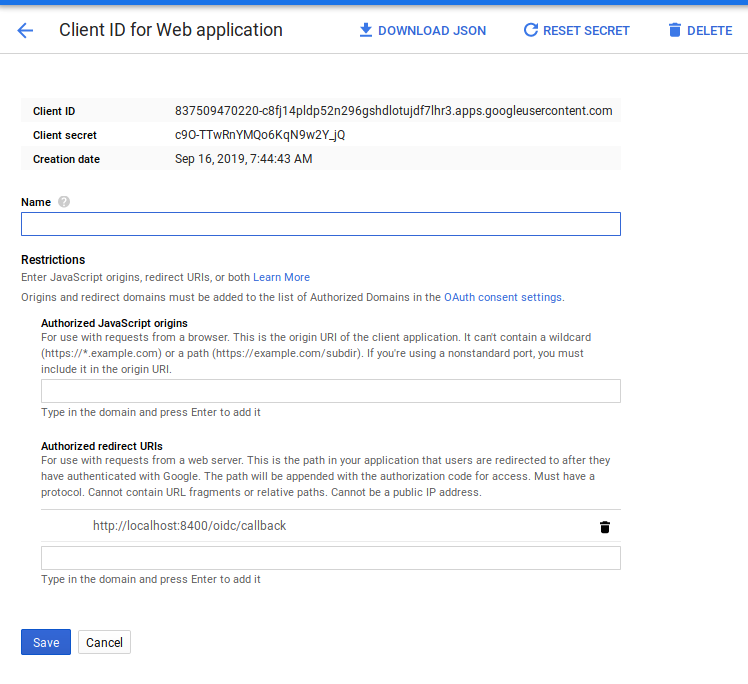
vault auth enable oidc

export CLIENT_ID=837509470220-c8fj14pldp52n296gshdlotujdf7lhr3.apps.googleusercontent.com
export CLIENT_SECRET=c9O-TTwRnYMQo6KqN9w2Y_jQ

vault write auth/oidc/role/tokensecrets \
        bound_audiences="$CLIENT_ID" \
        allowed_redirect_uris="http://localhost:8200/ui/vault/auth/oidc/oidc/callback" \
        allowed_redirect_uris="http://localhost:8250/oidc/callback" \
        user_claim="sub" \
        policies="token-policy,secrets-policy"

vault write auth/oidc/config oidc_client_id="$CLIENT_ID"  oidc_client_secret="$CLIENT_SECRET"  oidc_discovery_url=https://accounts.google.com default_role=tokensecrets
Now, in a new window, initalize a login session:
export VAULT_ADDR='http://localhost:8200'
vault login -method=oidc port=8400 role=tokensecrets
You should see a browser window popup. Once you login, your OIDC token will get sent to Vault which will proceed to authenticate/verify the token. Once verified, vault will return its own token with the tokensecrets role which inturn would include token-policy,secrets-policy.
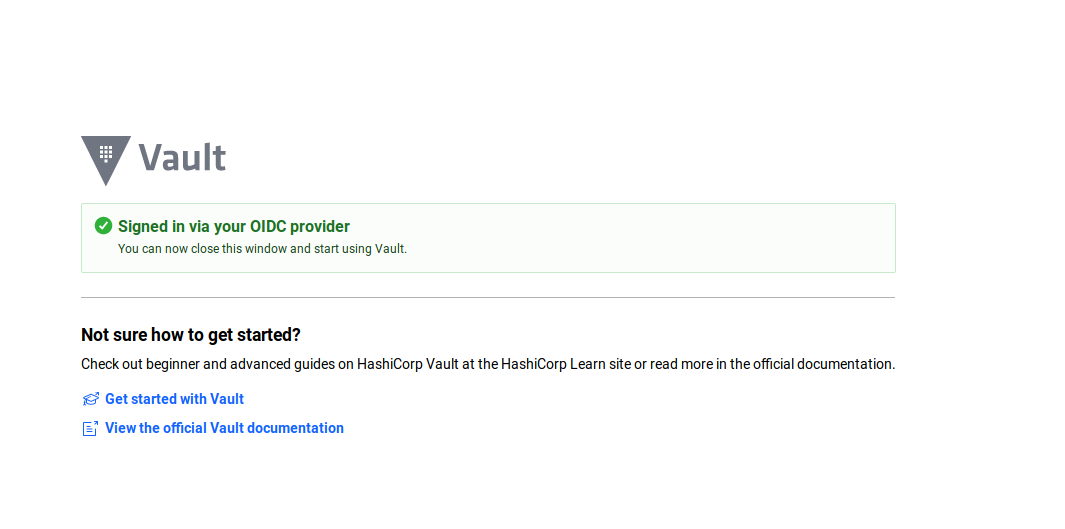
For example, the flow maybe:
$ vault login -method=oidc port=8400 role=tokensecrets
Complete the login via your OIDC provider. Launching browser to:

    https://accounts.google.com/o/oauth2/v2/auth?client_id=837509470220-c8fj14pldp52n296gshdlotujdf7lhr3.apps.googleusercontent.com&nonce=bed71d812d997baad01325424e740f3d4857f6c0&redirect_uri=http%3A%2F%2Flocalhost%3A8400%2Foidc%2Fcallback&response_type=code&scope=openid&state=78abc0c4f0fc7ff16068c8da7e356f1ec0e7bb57


Success! You are now authenticated. The token information displayed below
is already stored in the token helper. You do NOT need to run "vault login"
again. Future Vault requests will automatically use this token.

Key                  Value
---                  -----
token                s.9v1LCGzSah1UJCJd11ANpdK9
token_accessor       EQj0QFalxw9RIQCb4sxuE4Ap
token_duration       768h
token_renewable      true
token_policies       ["default" "secrets-policy" "token-policy"]
identity_policies    []
policies             ["default" "secrets-policy" "token-policy"]
token_meta_role      tokensecrets
Vault auth using Google JWT
The following sequence will use a GCP OIDC JWT Token for authentication. This is very similar to the vault gcp auth provider flows (vault auth enable gcp) except that this configures the OIDC provider directly.
This section will utilize vanilla JWT Auth and an OIDC token provided by the gcloud CLI’s client_id/secret for the current logged in user (i.,e the oidc token from gcloud auth print-identity-token)
Configure JWT Auth using GCP’s JWT URL and issuer:
vault auth enable jwt

vault write auth/jwt/config \
    jwks_url="https://www.googleapis.com/oauth2/v3/certs" \
    bound_issuer="https://accounts.google.com"
Now, w’ere going to use the current logged in user’s OIDC token. You can ofcourse use any GCP OIDC token (eg a service accounts, GCE VMs, etc)
export TOKEN=`gcloud auth print-identity-token`
echo $TOKEN
Decode the token using the debugger at jwt.io. For me the token claims were like this (yours will be different ofcourse)
{
  "iss": "https://accounts.google.com",
  "azp": "32555940559.apps.googleusercontent.com",
  "aud": "32555940559.apps.googleusercontent.com",
  "sub": "2232157913093274833624348",
  "hd": "google.com",
  "email": "root@google.com",
  "email_verified": true,
  "at_hash": "SRbtaUGXQKiLD5yhEiZV6w",
  "iat": 1608382461,
  "exp": 1608386061
}
the sub field is the unique identifier for the user. This is the primary key that identifies the user (not necessarily email)
the aud value of 32555940559.apps.googleusercontent.com is special: that is the client ID for the gcloud cli. You can acquire a GCE Vm’s OIDC token and specify arbitrary audiences.
eg. if you had an GCE VM called instance-3, you could ask it for an OIDC token
export TOKEN=`gcloud compute ssh instance-3 -- -t "curl -s -H 'Metadata-Flavor: Google' http://metadata.google.internal/computeMetadata/v1/instance/service-accounts/default/identity?audience=https://myapp-6w42z6vi3q-uc.a.run.app/vault/my-gce-role\&format=full; echo ''"`
Either way, you will need to create a JWT role that has the audience you picked specified. In the sample below, we are using gcloud cli’s aud client_id and binding the role to a specific user (eg, the subject field)
vault write auth/jwt/role/my-jwt-role \
    bound_subject="2232157913093274833624348" \
    user_claim="sub" \
    role_type="jwt" \
    bound_audiences="32555940559.apps.googleusercontent.com" \
    policies="secrets-policy" \
    ttl=1h
In a new window,
  export VAULT_ADDR='http://localhost:8200'
  export TOKEN=`gcloud auth print-identity-token`
  echo $TOKEN
  export VAULT_TOKEN=`vault write -field="token" auth/jwt/login role=my-jwt-role jwt="$TOKEN"`
  echo $VAULT_TOKEN
Now use the token:
  vault kv put kv/message foo=world
  vault kv get kv/message
To map GCE embedded claims in the JWT, specify the bound_claims parameter. In the sample below, the audience, subject and projectID must match up to the JWT
vault write auth/jwt/role/my-jwt-role -<<EOF
  {
    "user_claim": "sub",
    "bound_subject": "116886099908689513068",
    "bound_audiences": "https://myapp-6w42z6vi3q-uc.a.run.app/vault/my-gce-role",
    "role_type": "jwt",
    "policies": "secrets-policy",
    "ttl": "1h",
    "bound_claims": { "google/compute_engine/project_id": ["mineral-minutia-820"] }
  }
EOF
the corresponding JWT that is valid for the rule above is
{
  "aud": "https://myapp-6w42z6vi3q-uc.a.run.app/vault/my-gce-role",
  "azp": "116886099908689513068",
  "email": "gce-svc-account@mineral-minutia-820.iam.gserviceaccount.com",
  "email_verified": true,
  "exp": 1608423216,
  "google": {
    "compute_engine": {
      "instance_creation_timestamp": 1602867595,
      "instance_id": "8799667957578322428",
      "instance_name": "instance-3",
      "project_id": "mineral-minutia-820",
      "project_number": 1071284184436,
      "zone": "us-central1-a"
    }
  },
  "iat": 1608419616,
  "iss": "https://accounts.google.com",
  "sub": "116886099908689513068"
}
Your project and service account sub will be different. To acquire a token from you GCE environment, you must specify your own setting above and acquire the JWT token from the GCE instance you created (in the example below, its instance-3)
export TOKEN=`gcloud compute ssh instance-3 -- -t "curl -s -H 'Metadata-Flavor: Google' http://metadata.google.internal/computeMetadata/v1/instance/service-accounts/default/identity?audience=https://myapp-6w42z6vi3q-uc.a.run.app/vault/my-gce-role\&format=full; echo ''"`
export VAULT_TOKEN=`vault write -field="token" auth/jwt/login role=my-jwt-role jwt="$TOKEN"`
echo $VAULT_TOKEN

  vault kv put kv/message foo=world
  vault kv get kv/message
GCP Vault Secrets
AccessToken
In the Admin window, run the following to enable the gcp secres and to create a policy that will allow you to get a token to access a GCS Bucket.
vault secrets enable gcp
export BUCKET=$PROJECT_ID-bucket
gsutil mb gs://$BUCKET
cat <<EOF > gcs.hcl
resource "buckets/$BUCKET" {
roles = ["roles/storage.objectViewer"]
}
EOF
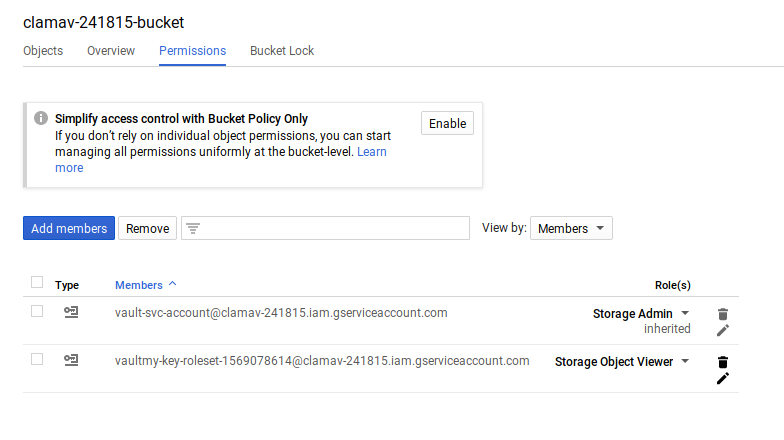
vault write gcp/roleset/my-token-roleset project="$PROJECT_ID" secret_type="access_token" token_scopes="https://www.googleapis.com/auth/cloud-platform" bindings=@gcs.hcl
Now notice that you have a new Service account created by Vault
gcloud iam service-accounts list --format="value(email)"

generic-svc-account@$PROJECT_ID.iam.gserviceaccount.com
vaultmy-token-roles-1569029072@$PROJECT_ID.iam.gserviceaccount.com   <<<<<<<<
vault-svc-account@$PROJECT_ID.iam.gserviceaccount.com
Create a new window and export the restricted token we set at the very beginning s.H2Ad0J78eSFT2OrcGRo5H8ai
export PROJECT_ID=`gcloud config get-value core/project`
export VAULT_ADDR='http://localhost:8200'
export BUCKET=$PROJECT_ID-bucket

export VAULT_TOKEN=s.H2Ad0J78eSFT2OrcGRo5H8ai

vault read gcp/token/my-token-roleset
Key                   Value
---                   -----
expires_at_seconds    1568631008
token                 ya29.c.ElqFB2Lax07ndRSNbPWr84xdrNl-RqiDvgfEMKyhpCjanBQ7-redacted
token_ttl             59m59s
This works because we placed a rule into secrets_policy.hcl:
path "gcp/token/my-token-roleset" {
    capabilities = ["read"]
}
Now use the access_token in a GCS API Call
export ACCESS_TOKEN=<your_token>
curl -H "Authorization: Bearer $ACCESS_TOKEN" https://www.googleapis.com/storage/v1/b/$BUCKET/o
Now deleting the vault roleset also deletes the temp service account it setup in the authorized Admin terminal
vault delete gcp/roleset/my-token-roleset

gcloud iam service-accounts list --format="value(email)"
vault-svc@$PROJECT_ID.iam.gserviceaccount.com
Vault TokenSource
VaultTokenSource provides a google cloud credential and tokenSource derived from a VAULT_TOKEN.
Vault must be configure first to return a valid access_token with appropriate permissions on the resource being accessed on GCP.
See https://github.com/salrashid123/oauth2#usage-vaulttokensource
package main

import (
	"context"
	"fmt"
	"io"
	"log"
	"os"

	"cloud.google.com/go/storage"

	sal "github.com/salrashid123/oauth2/vault"
	"google.golang.org/api/option"
)

var (
	projectId  = "pubsub-msg"
	bucketName = "pubsub-msg-bucket"
	objectName = "somefile.txt"
)

func main() {
	ts, err := sal.VaultTokenSource(
		&sal.VaultTokenConfig{
			VaultToken: "s.URldGrQaEajbEgZB9KLjOJPQ",
			VaultPath:  "gcp/token/my-token-roleset",
			VaultAddr: "http://localhost:8200",
		},
	)

	ctx := context.Background()

	storageClient, err := storage.NewClient(ctx, option.WithTokenSource(ts))
  ...
}
ServiceAccount Key
Vault auth can also return the RAW service account key material inline…basically the temporary raw key.
This endpoint generates a new GCP IAM service account key associated with the roleset’s Service Account. When the lease expires (or is revoked early), the Service Account key will be deleted.
Editorial: I’m not sure why the full raw key is ever exported outside of Vault…it’d be better to just expose capabilities from within Vault itself (eg, sign, getAccessToken(), etc)
Anyway, to export temporary generated key, first create the role to bind a key to the GCS bucket IAM permissions we setup earlier:
vault write gcp/roleset/my-key-roleset \
    project="$PROJECT_ID" \
    secret_type="service_account_key"  \
    bindings=@gcs.hcl
Now read the service key material back
$ vault read gcp/key/my-key-roleset
Key                 Value
---                 -----
lease_id            gcp/key/my-key-roleset/DwvuEAvpWXyomEu9uKmc7Ncc
lease_duration      768h
lease_renewable     true
key_algorithm       KEY_ALG_RSA_2048
key_type            TYPE_GOOGLE_CREDENTIALS_FILE
private_key_data    ewogICJ0eXBl<redacted>  <<<<<<<
Notice a new service account key was created
$ gcloud iam service-accounts list --format="value(email)"

vaultmy-key-roleset-1569078614@clamav-241815.iam.gserviceaccount.com  <<<<
generic-svc-account@$PROJECT_ID.iam.gserviceaccount.com
vault-svc-account@$PROJECT_ID.iam.gserviceaccount.com
And the permissions were added onto the bucket we requested per the gcs.hcl configuration
To delete the generated service account, run
$ vault delete gcp/roleset/my-key-roleset
KMS based secrets
In this mode, you use Vault to encrypt/decrypt a small amount of data but the actual key that is used is saved in Google Cloud KMS. For more informatin, see Introducing the Cloud KMS plugin for HashiCorp Vault
In the Admin window, first create the Keyring that Vault will use.
export VAULT_KMS_KEYRING=vaultkr
export VAULT_KMS_KEY_1=my-vault-key


gcloud kms keyrings create $VAULT_KMS_KEYRING  --location global

gcloud kms keyrings add-iam-policy-binding $VAULT_KMS_KEYRING  --location global --member=serviceAccount:$VAULT_SERVICE_ACCOUNT     --role='roles/cloudkms.admin'
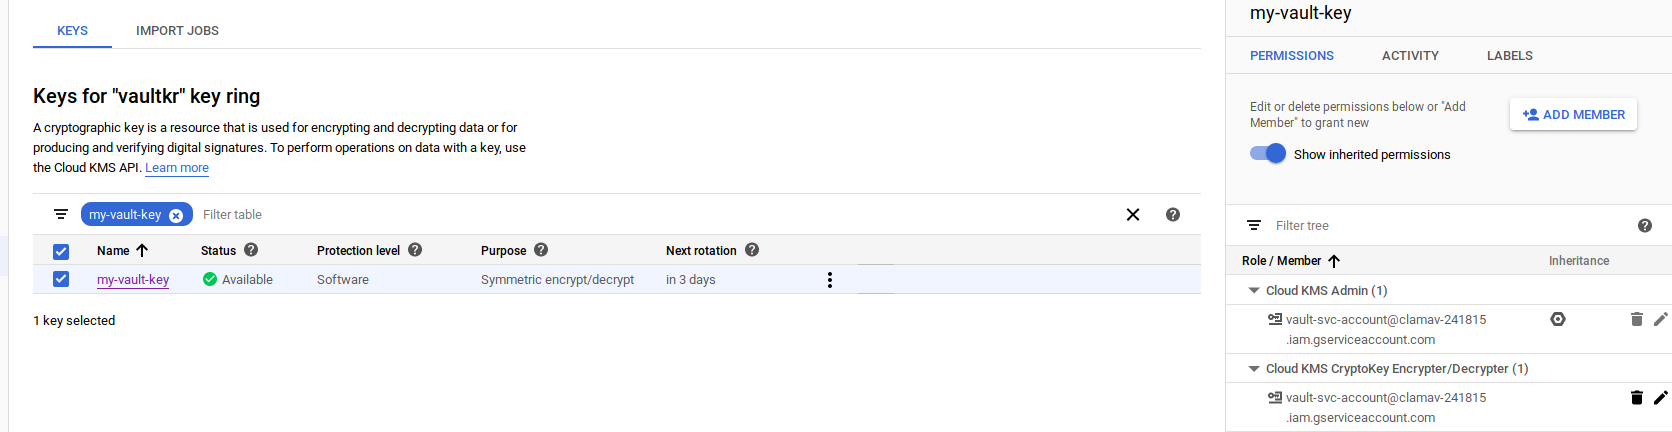
Now enable the KMS secrets backend and follow the article above to bind a KMS backed key. Vault will automatically create a KMS key but you will have to separately allow Vault to use it to encrypt/decrypt
$ vault secrets enable gcpkms
$ vault write gcpkms/keys/my-vault-key   key_ring=projects/$PROJECT_ID/locations/global/keyRings/$VAULT_KMS_KEYRING   rotation_period=72h

$ gcloud kms keys add-iam-policy-binding $VAULT_KMS_KEY_1 --keyring $VAULT_KMS_KEYRING --location global --member=serviceAccount:$VAULT_SERVICE_ACCOUNT     --role='roles/cloudkms.cryptoKeyEncrypterDecrypter'
Now use the KMS key to encrypt and decrypt:
$ vault write gcpkms/encrypt/my-vault-key plaintext="hello world"
Key            Value
---            -----
ciphertext     CiQAUcaXuBHC069MPabYTgMrlMM3v9Y3YLFnnhgok3MOifRFJ2QSNADA8Jp997Y/b3WLk95itDJpOWoVitURBHdfMUJK92JMc4kbQUoG4RvPvrpxZd7/Tci0gwI=
key_version    1
$ vault write gcpkms/decrypt/my-vault-key ciphertext="CiQAUcaXuBHC069MPabYTgMrlMM3v9Y3YLFnnhgok3MOifRFJ2QSNADA8Jp997Y/b3WLk95itDJpOWoVitURBHdfMUJK92JMc4kbQUoG4RvPvrpxZd7/Tci0gwI="
Key          Value
---          -----
plaintext    hello world
Once you delete the Vault key, the KMS key is also deleted
$ vault delete gcpkms/keys/my-vault-key
Terraform Credentials from Vault
Configure Terraform to get GCP credentials from Vault
also see Read GCP credentials from Vault in Terraform
export PROJECT_ID=`gcloud config get-value core/project`
export PROJECT_NUMBER=`gcloud projects describe $PROJECT_ID --format='value(projectNumber)'`
- make sure vault runs with permissions to do binding and create SA
gcloud auth application-default login
- Start Vault
vault server --dev
- Enable gcp auth for vault
in a new window paste the root vault token
export VAULT_ADDR='http://localhost:8200'
export VAULT_TOKEN=...root_token...

vault secrets enable gcp
- Create Vault policy and token
in new window
remember to edit the bucket and project id below (in my case, the projectid is fabled-ray-104117)
cat <<EOF > projects.hcl
resource "projects/fabled-ray-104117" {
   roles = ["roles/browser"]
}
EOF

vault write gcp/roleset/my-token-roleset  \
    project="$PROJECT_ID"  \
    secret_type="access_token"  \
    token_scopes="https://www.googleapis.com/auth/cloud-platform,https://www.googleapis.com/auth/userinfo.email"  \
    bindings=@projects.hcl

vault policy write secrets-policy  secrets_policy.hcl
vault policy write token-policy  token_policy.hcl
vault token create  -policy=secrets-policy -policy=token-policy
- In new window, test vault policy returns an access token
export VAULT_ADDR='http://localhost:8200'
export VAULT_TOKEN=..token_from_step_4..

vault read gcp/token/my-token-roleset
- In new window, edit main.tf and set the VUALT_TOKEN value from step 5
provider "vault" {
  address = "http://localhost:8200"
  token   = "..token_from_step_4.."
}

data "vault_generic_secret" "gcp_token" {
  path = "gcp/token/my-token-roleset"
}

provider "google" {
  access_token = data.vault_generic_secret.gcp_token.data["token"]
}

data "google_project" "project" {
  project_id = "fabled-ray-104117"
}

output "project_number" {
  value = data.google_project.project.number
}
terraform apply
what you should see is the projectid number
Misc
Vault Enhancement Feature Requests
The following are just enhancements to Vault-GCP secrets plugin I requested:
Asking Vault to return OIDC tokens
This feature will return an OpenID Connect token that represents the service account that gets generated:
Asking Vault to return GCP JWTAccessToken
This feature will return a JWTAccessToken to use as a substitute to traditional oauth2 access_token when accessing GCP APIs.
For more information, see Faster ServiceAccount authentication for Google Cloud Platform APIs
Thats it…this is nothing new, you can read the docs that cover it anyway but the way i understand things is to do them by hand. Hope you found this useful.
This site supports webmentions. Send me a mention via this form.